Pre-orders are a powerful way to capture demand for upcoming products, continue selling when inventory runs low, and validate product ideas before manufacturing. This comprehensive guide shows you exactly how to set up pre-orders on Shopify, whether you're using an app or manual methods.
Table of Contents
- Why Enable Pre-Orders on Your Shopify Store?
- 3 Ways to Set Up Pre-Orders on Shopify
- Step-by-Step: Setting Up Pre-Orders with K1 PreOrder
- Pre-Order Best Practices
- Common Problems & Solutions
- FAQ
- Conclusion
- Related Resources
Why Enable Pre-Orders on Your Shopify Store?
Pre-orders solve critical business challenges that every Shopify merchant faces:
1. Never Lose Sales to "Sold Out"
When a product goes out of stock, showing a "Sold Out" button is like hanging a "Closed" sign on your store's door. With pre-orders, you can continue selling and capture customer demand instead of turning people away.

2. Launch Products with Confidence
Pre-orders let you validate demand before investing in manufacturing or large inventory orders. You'll know exactly how many units customers want before you commit capital.
Real-world example: A clothing merchant launching a new jacket design can take 50 pre-orders before placing their manufacturing order, reducing risk and avoiding excess inventory.
3. Improve Cash Flow
Collect deposits or full payments before your products arrive. This advance revenue helps fund inventory purchases and reduces the need for business loans or credit lines.
4. Build Anticipation & Marketing Momentum
Pre-orders create urgency and exclusivity. Customers who pre-order become invested in your product launch and are more likely to share their excitement on social media.
5. Manage Inventory More Effectively
For made-to-order or custom products, pre-orders let you produce exactly what's sold, eliminating excess inventory and reducing storage costs.
According to Shopify's official documentation, pre-orders are supported through Shopify's Selling Plans system, which enables flexible payment and fulfillment options.
3 Ways to Set Up Pre-Orders on Shopify
Shopify offers three approaches to implementing pre-orders, each with different complexity levels and capabilities:
Comparison of All Methods
| Criteria | Pre-Order App | Manual Code | Shopify Functions |
|---|---|---|---|
| Best for | Most merchants | Developers with Liquid/JS skills | Enterprise with custom needs |
| Complexity | Low (5-10 min) | High (2-4 hours) | Very High (weeks/months) |
| Cost | $0-100/month | Free (dev time) | Dev time + hosting |
| Maintenance | None (auto-updates) | High (theme updates break) | Ongoing required |
| Features | Full-featured | Basic only | Custom/unlimited |
| Support | App developer support | None | Self-supported |
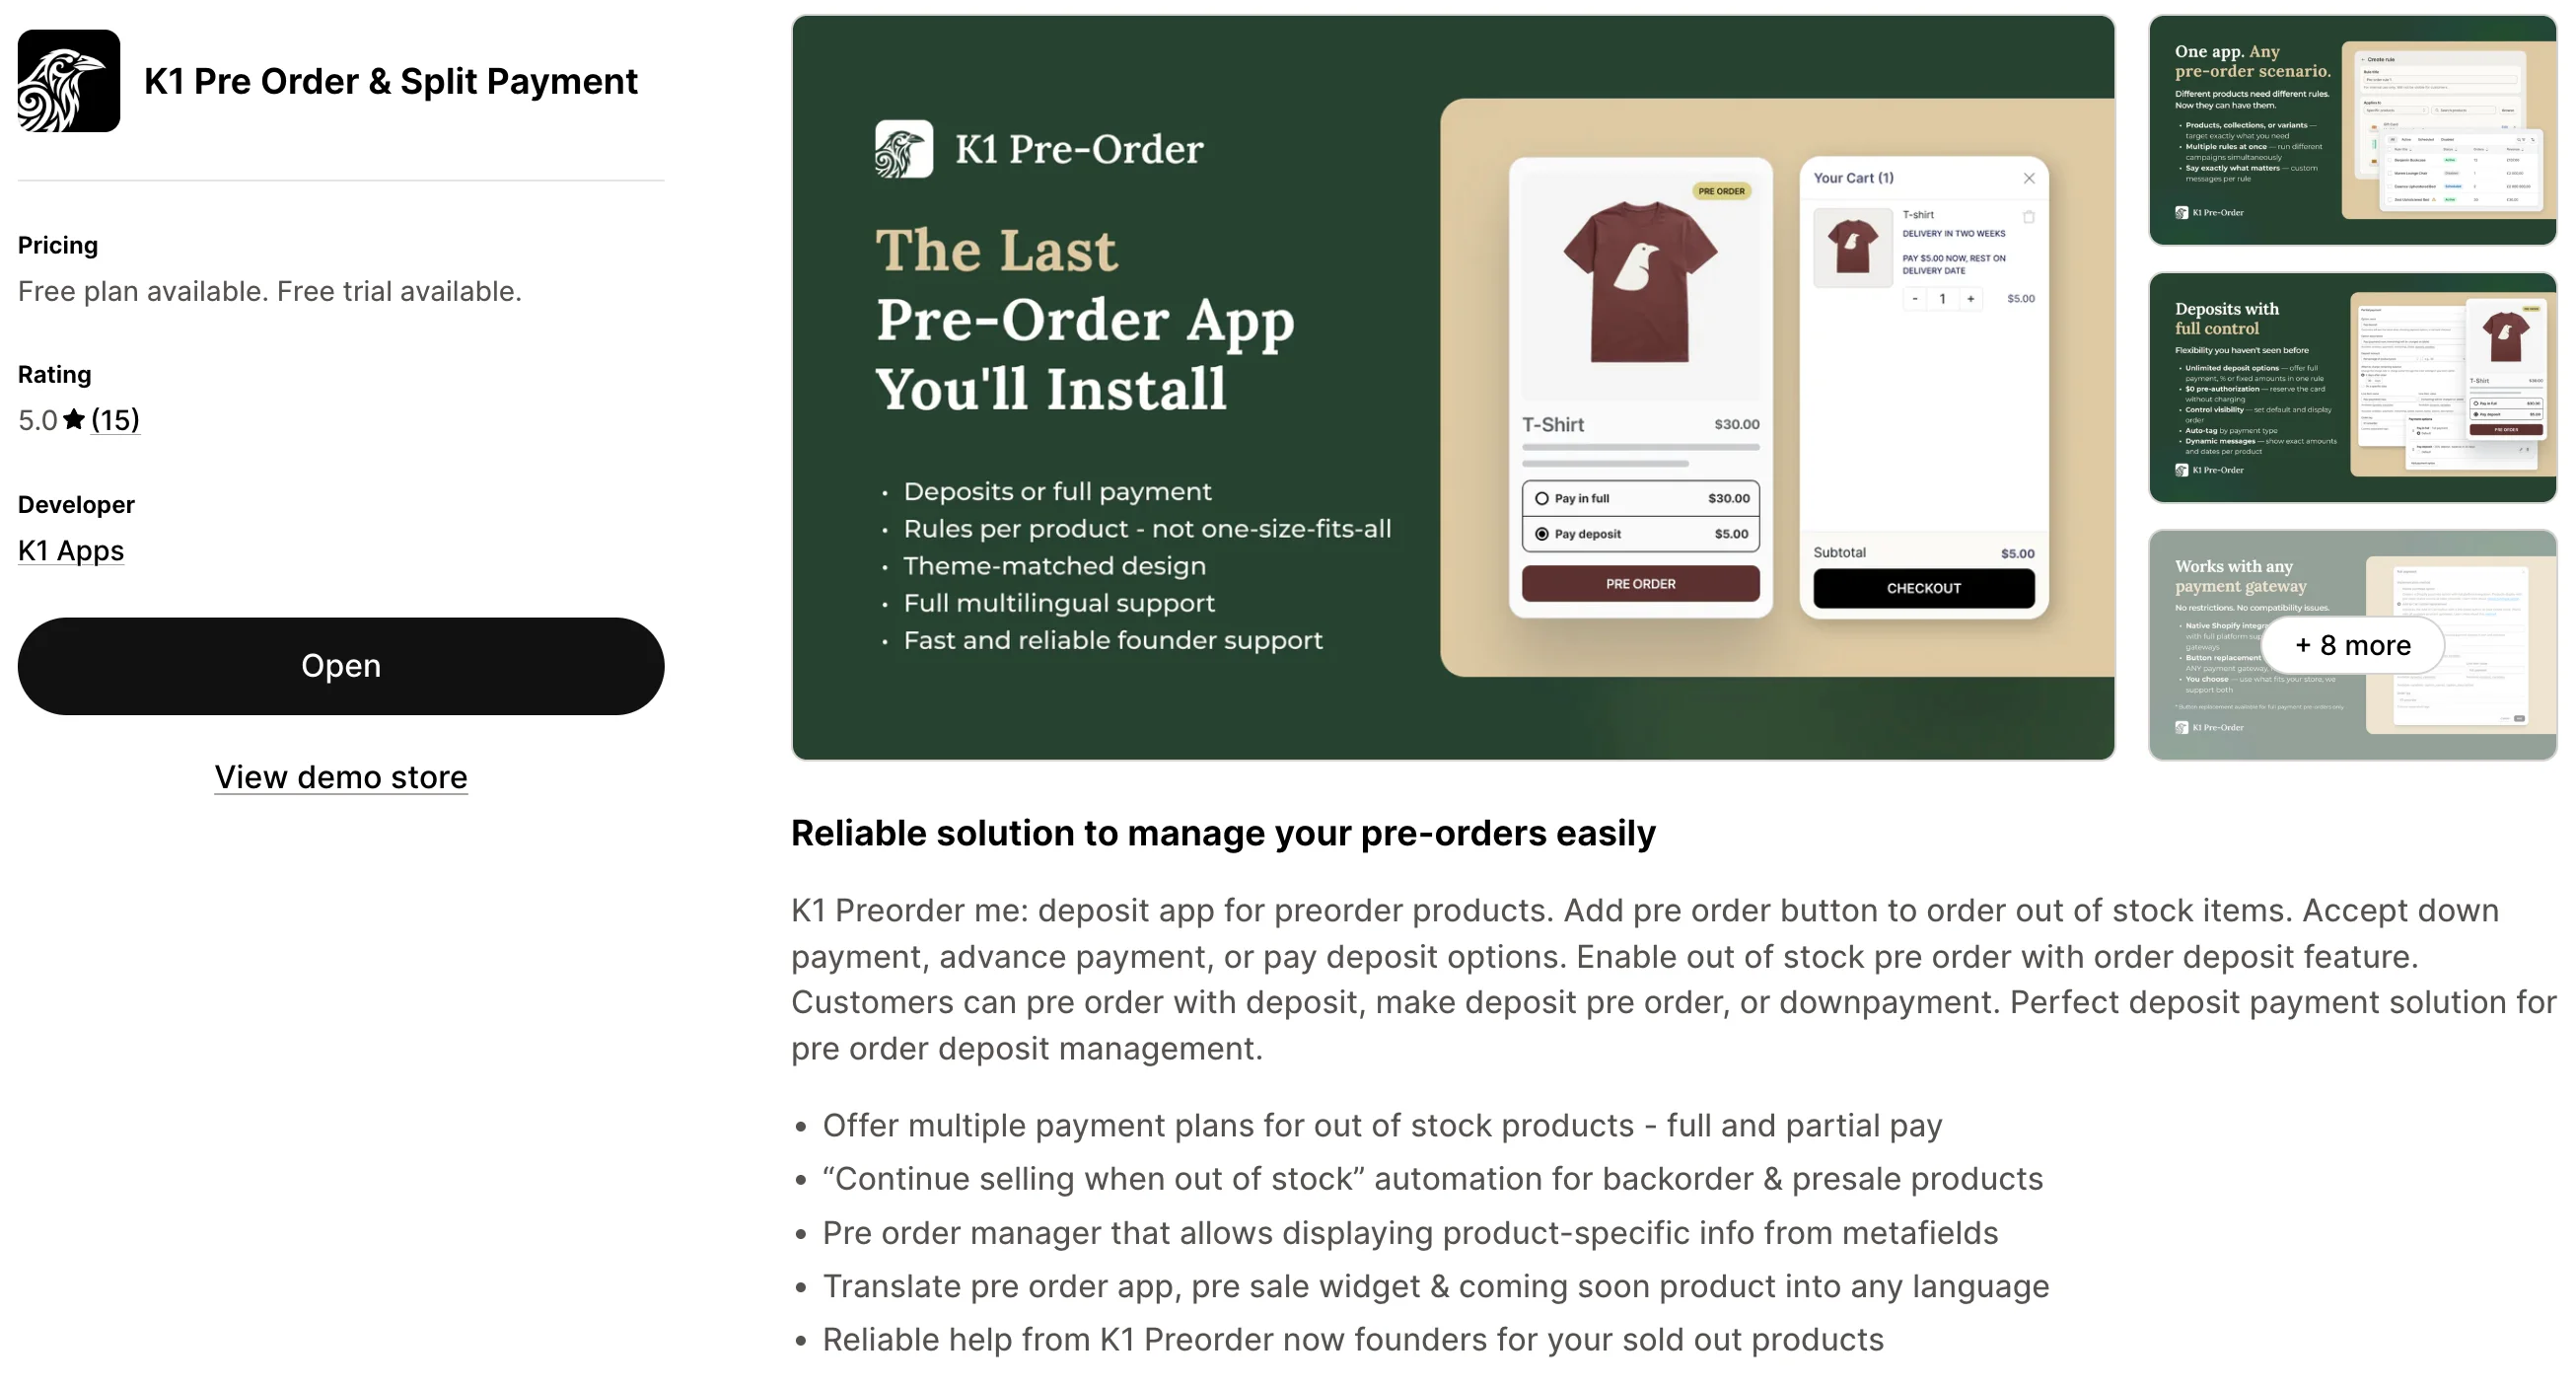
Method 1: Using a Pre-Order App (Recommended)
Best for: Most merchants who want reliable, feature-rich pre-orders
Complexity: Low (5-10 minutes setup)
Cost: $0-100/month depending on the app
Pre-order apps provide the most complete solution with features like:
- Instant button replacement ("Add to Cart" → "Pre-Order Now")
- Automatic out-of-stock detection
- Inventory threshold triggers
- Scheduled pre-order campaigns
- Order tagging for fulfillment
- Custom messaging and badges
- Email notifications
Pre-Order App: Pros & Cons
| ✅ Pros | ❌ Cons |
|---|---|
| No coding required | Monthly subscription cost (though many have free plans) |
| Works immediately after installation | Adds another app to your store |
| Regular updates and support | |
| Advanced features included | |
| Compatible with most themes |
Learn more about the best Shopify pre-order apps →
Method 2: Manual Theme Code Changes
Best for: Developers comfortable with Liquid/JavaScript
Complexity: High (2-4 hours for basic implementation)
Cost: Free (but requires technical expertise)
This method involves modifying your theme's code to display pre-order functionality. According to Shopify's theme documentation, you can integrate pre-orders using Liquid objects and JavaScript.
What you'll need to modify:
- Product page template (product.liquid or equivalent section)
- Cart page template (cart.liquid)
- Product form JavaScript
- CSS styling for pre-order badges
Basic implementation steps:
{% comment %} Example: Add pre-order button based on inventory {% endcomment %}
{% if product.selected_or_first_available_variant.inventory_quantity <= 0 %}
  <button type="submit" name="add" class="btn btn--pre-order">
    Pre-Order Now
  </button>
{% else %}
  <button type="submit" name="add" class="btn btn--add-to-cart">
    Add to Cart
  </button>
{% endif %}
Important considerations:
- You must handle inventory tracking manually
- Cart modifications required to show pre-order status
- No automatic order tagging for fulfillment
- Breaks when theme updates unless carefully maintained
- Doesn't work with "Continue selling when out of stock" setting automatically
Manual Code: Pros & Cons
| ✅ Pros | ❌ Cons |
|---|---|
| No monthly costs | Time-consuming to build and maintain |
| Full control over implementation | Requires Liquid/JavaScript knowledge |
| No third-party dependencies | May break with theme updates |
| Limited features compared to apps | |
| No support if issues arise |
Method 3: Shopify Functions (Advanced)
Best for: Enterprise merchants with custom requirements
Complexity: Very High (requires developer resources)
Cost: Development time + potential hosting costs
Shopify Functions allow you to build custom pre-order logic using GraphQL Admin API and selling plans. This is the underlying technology that pre-order apps use.
Key components:
- Selling Plan Groups - Container for your pre-order options
- Selling Plans - Define billing, delivery, and inventory policies
- GraphQL mutations - Create and manage selling plans
Example GraphQL mutation for creating a pre-order:
mutation {
  sellingPlanGroupCreate(
    input: {
      name: "Pre-order"
      merchantCode: "pre-order"
      options: ["Pre-order"]
      sellingPlansToCreate: [
        {
          name: "Pre-order - Ships in 4 weeks"
          category: PRE_ORDER
          billingPolicy: {
            fixed: {
              checkoutCharge: {type: PERCENTAGE, value: {percentage: 20.0}}
              remainingBalanceChargeTrigger: EXACT_TIME
              remainingBalanceChargeExactTime: "2026-02-15"
            }
          }
          deliveryPolicy: {fixed: {fulfillmentTrigger: UNKNOWN}}
          inventoryPolicy: {reserve: ON_FULFILLMENT}
        }
      ]
    }
    resources: {productIds: ["gid://shopify/Product/123"]}
  ) {
    sellingPlanGroup {
      id
    }
    userErrors {
      field
      message
    }
  }
}
Required access scopes:
write_productsread_all_orderswrite_purchase_optionsread_payment_mandatewrite_payment_mandate
Shopify Functions: Pros & Cons
| ✅ Pros | ❌ Cons |
|---|---|
| Maximum flexibility | Requires significant development resources |
| Custom business logic | Complex API knowledge needed |
| Native Shopify integration | Ongoing maintenance required |
| No recurring app fees | Must build entire UI from scratch |
| Time to market: weeks/months vs. minutes with apps |
Read Shopify's official guide on building pre-order solutions →
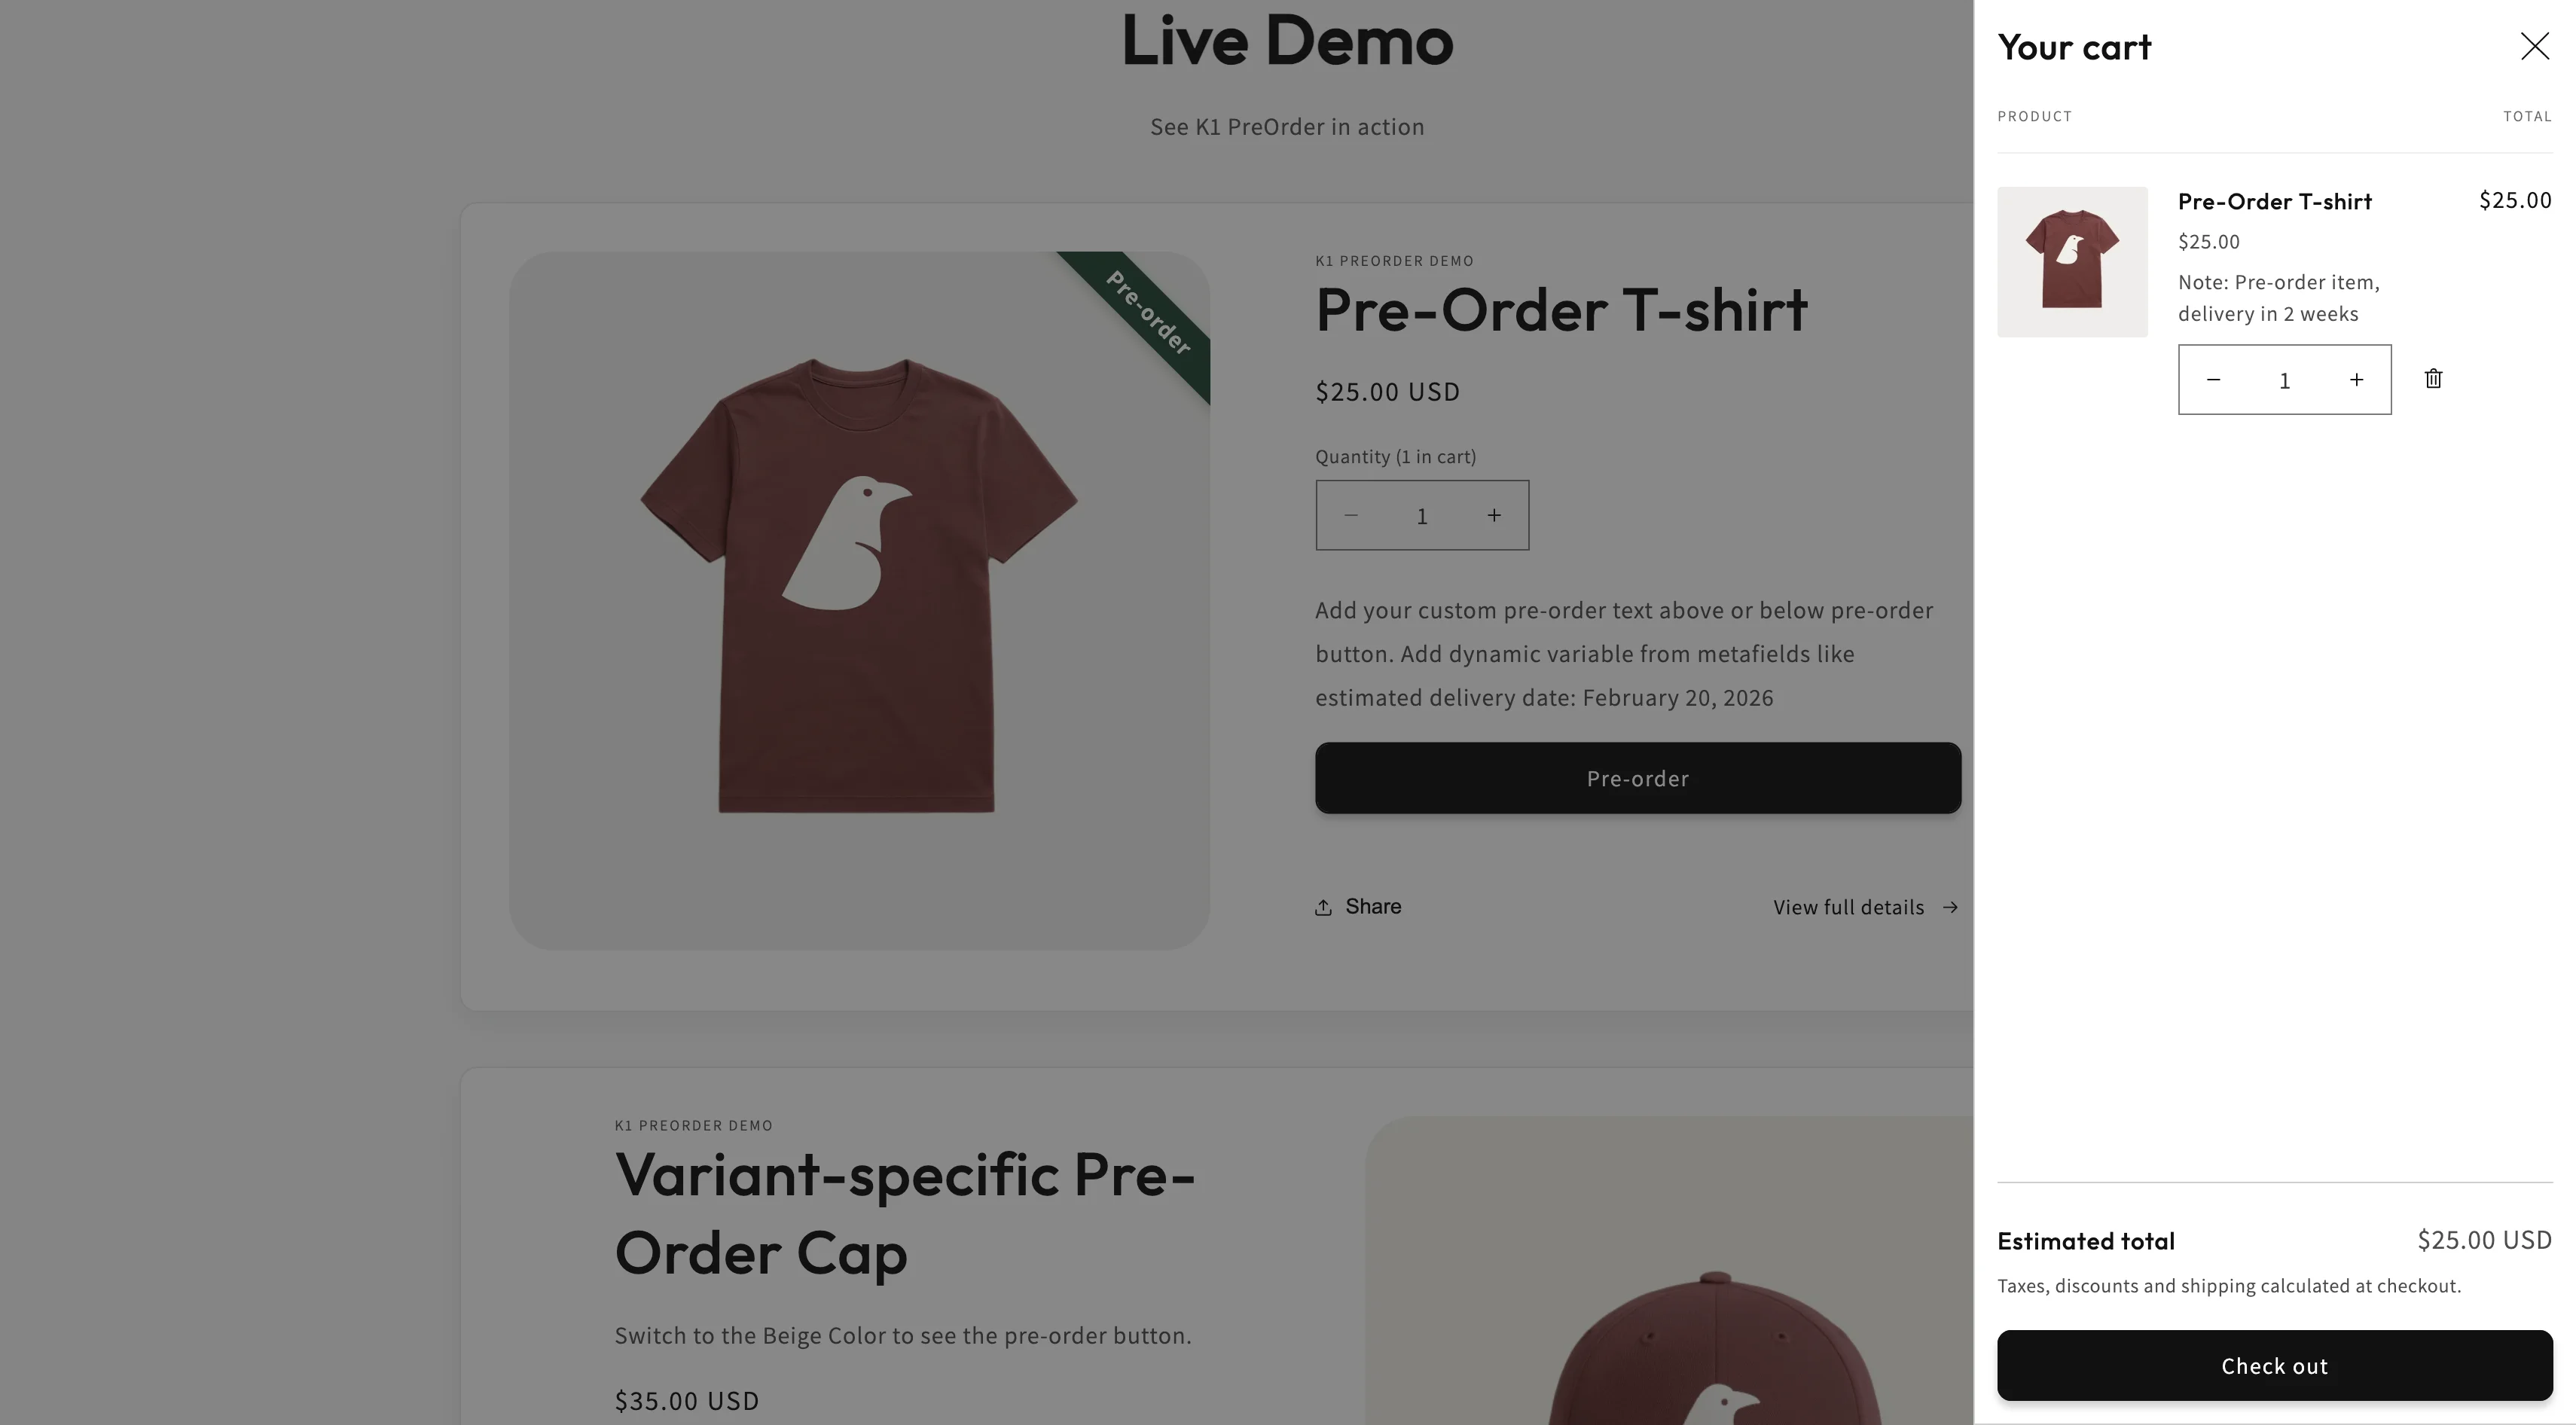
Step-by-Step: Setting Up Pre-Orders with K1 PreOrder
This section provides a detailed walkthrough of setting up pre-orders using K1 PreOrder app. The principles apply to most pre-order apps with minor interface differences.
Step 1: Install the App
Installing K1 PreOrder takes just a few minutes. Here's how to get started:
1. Find the app in Shopify App Store
- Go to the Shopify App Store
- Search for "K1 PreOrder" or click the direct link above
- Click Install to begin installation
2. Approve permissions
- Shopify will show the required permissions for the app
- Click Install app to confirm
3. Complete the Setup Guide
After installation, you'll see the K1 PreOrder dashboard with a Setup Guide showing 3 steps:
- Step 1: Enable app in the theme — Click "Enable" to open the theme customizer, then click "Save" in the top right corner to activate the app embed
- Step 2: Create pre-order rule — Create your first rule (covered in next section)
- Step 3: Customize pre-order button design — Visit the Design page to review styling options
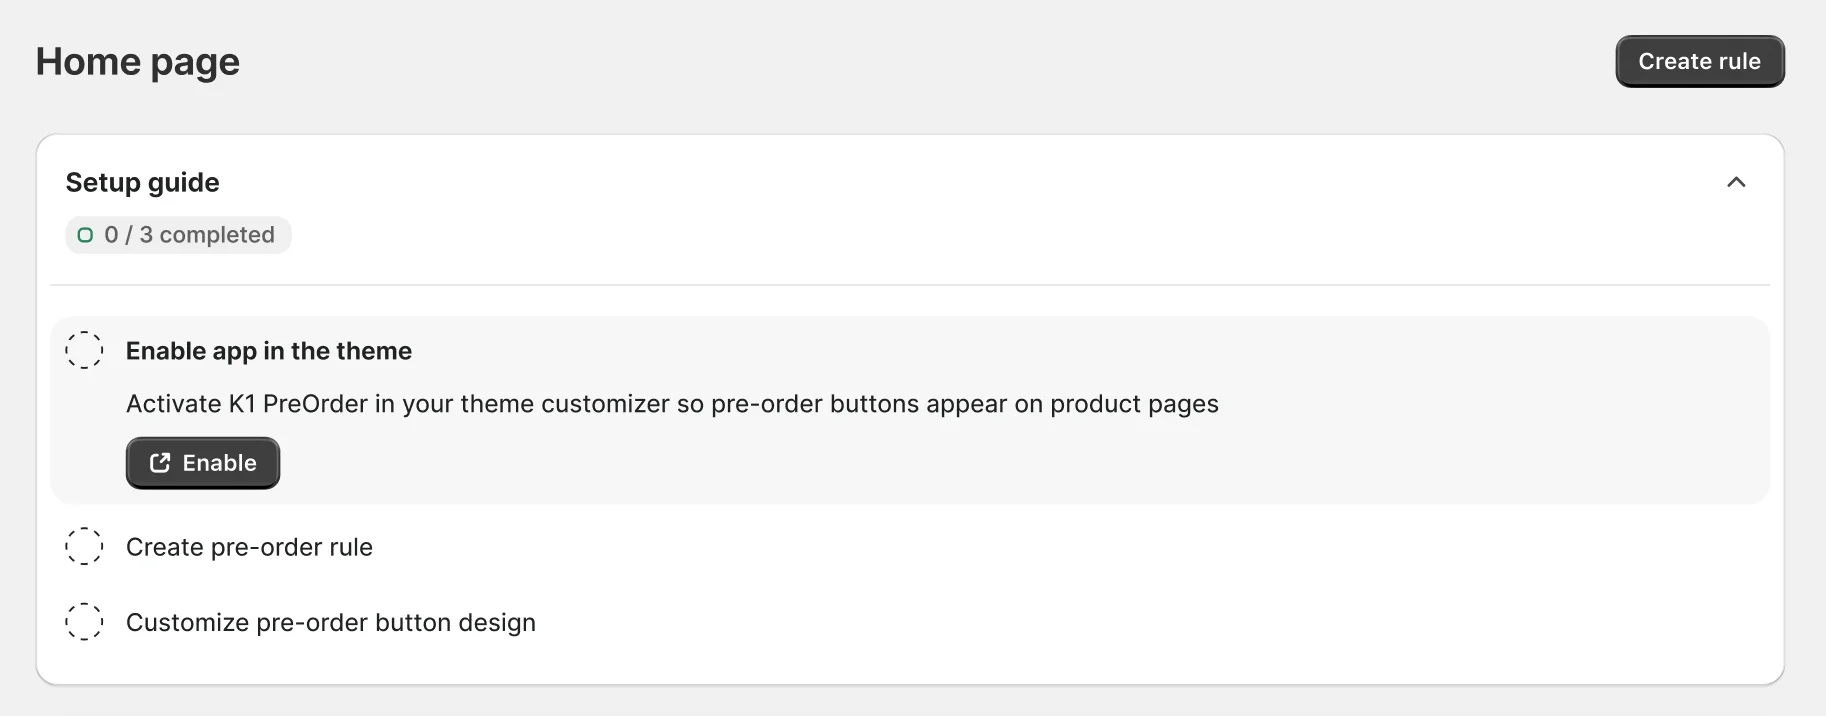
The Setup Guide automatically tracks your progress. Once all three steps are complete, you can dismiss the guide. If you later disable the app embed in your theme, a warning banner will appear to remind you to re-enable it.
Important: The app embed must be enabled in your live theme for pre-orders to display on your storefront. The setup guide verifies this automatically within 1-2 seconds after you save in the theme editor.
Step 2: Create Your First Pre-Order Rule
Pre-order rules determine which products display the pre-order button and under what conditions.
Here's how to create your first pre-order rule in K1 PreOrder:
1. Access the Create Rule page
- From the K1 PreOrder dashboard, click Create Rule button in the header
- Or click "Create rule" from the Setup Guide
2. Name your rule
- Enter a descriptive name (e.g., "Spring Collection Pre-order" or "New Product Launch")
- The app auto-generates a unique name, but you can customize it
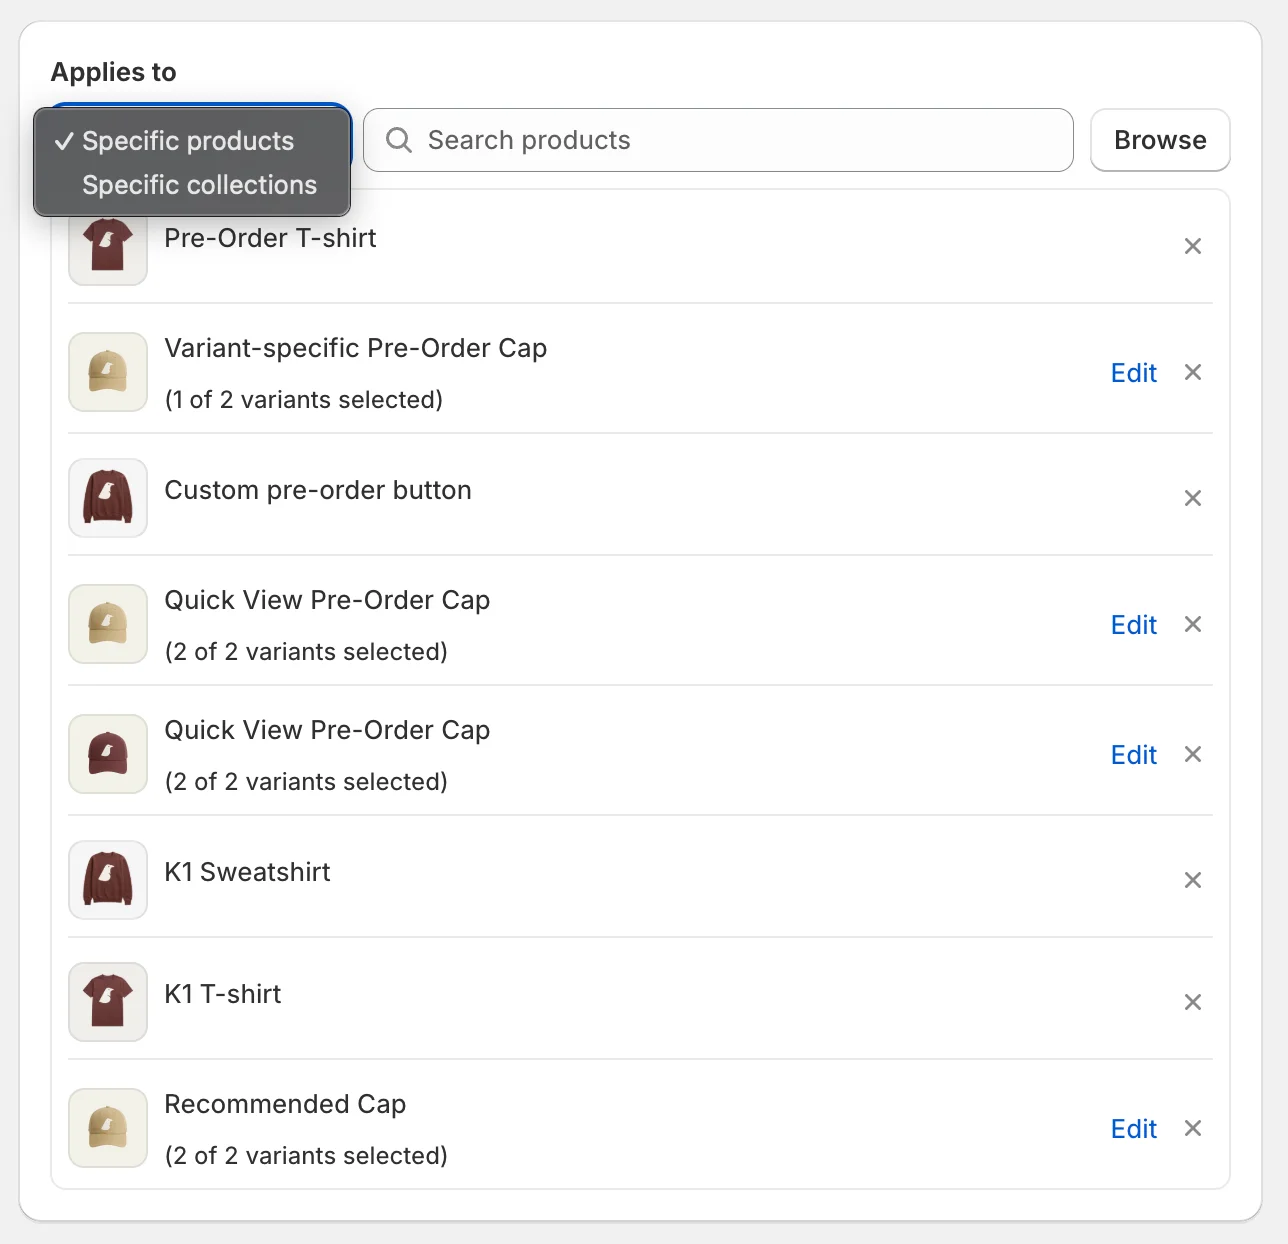
3. Select products or collections ("Applies To" section)
- Click Add products or Add collections
- Use the picker to select specific products, variants, or entire collections
- For variant-level targeting, click Edit next to a product to select specific variants
- Collections automatically include future products added to them
4. Configure payment options ("Payment Options" section)

By default, Full Payment (100% at checkout) is active. Optionally, add a Partial Payment option:
- Set deposit as percentage (e.g., 30%) or fixed amount (e.g., $50)
- Choose when balance is charged: X days after order or specific date
- Add multiple payment options — customers choose at checkout
- Customize labels, messages, and order tags per option
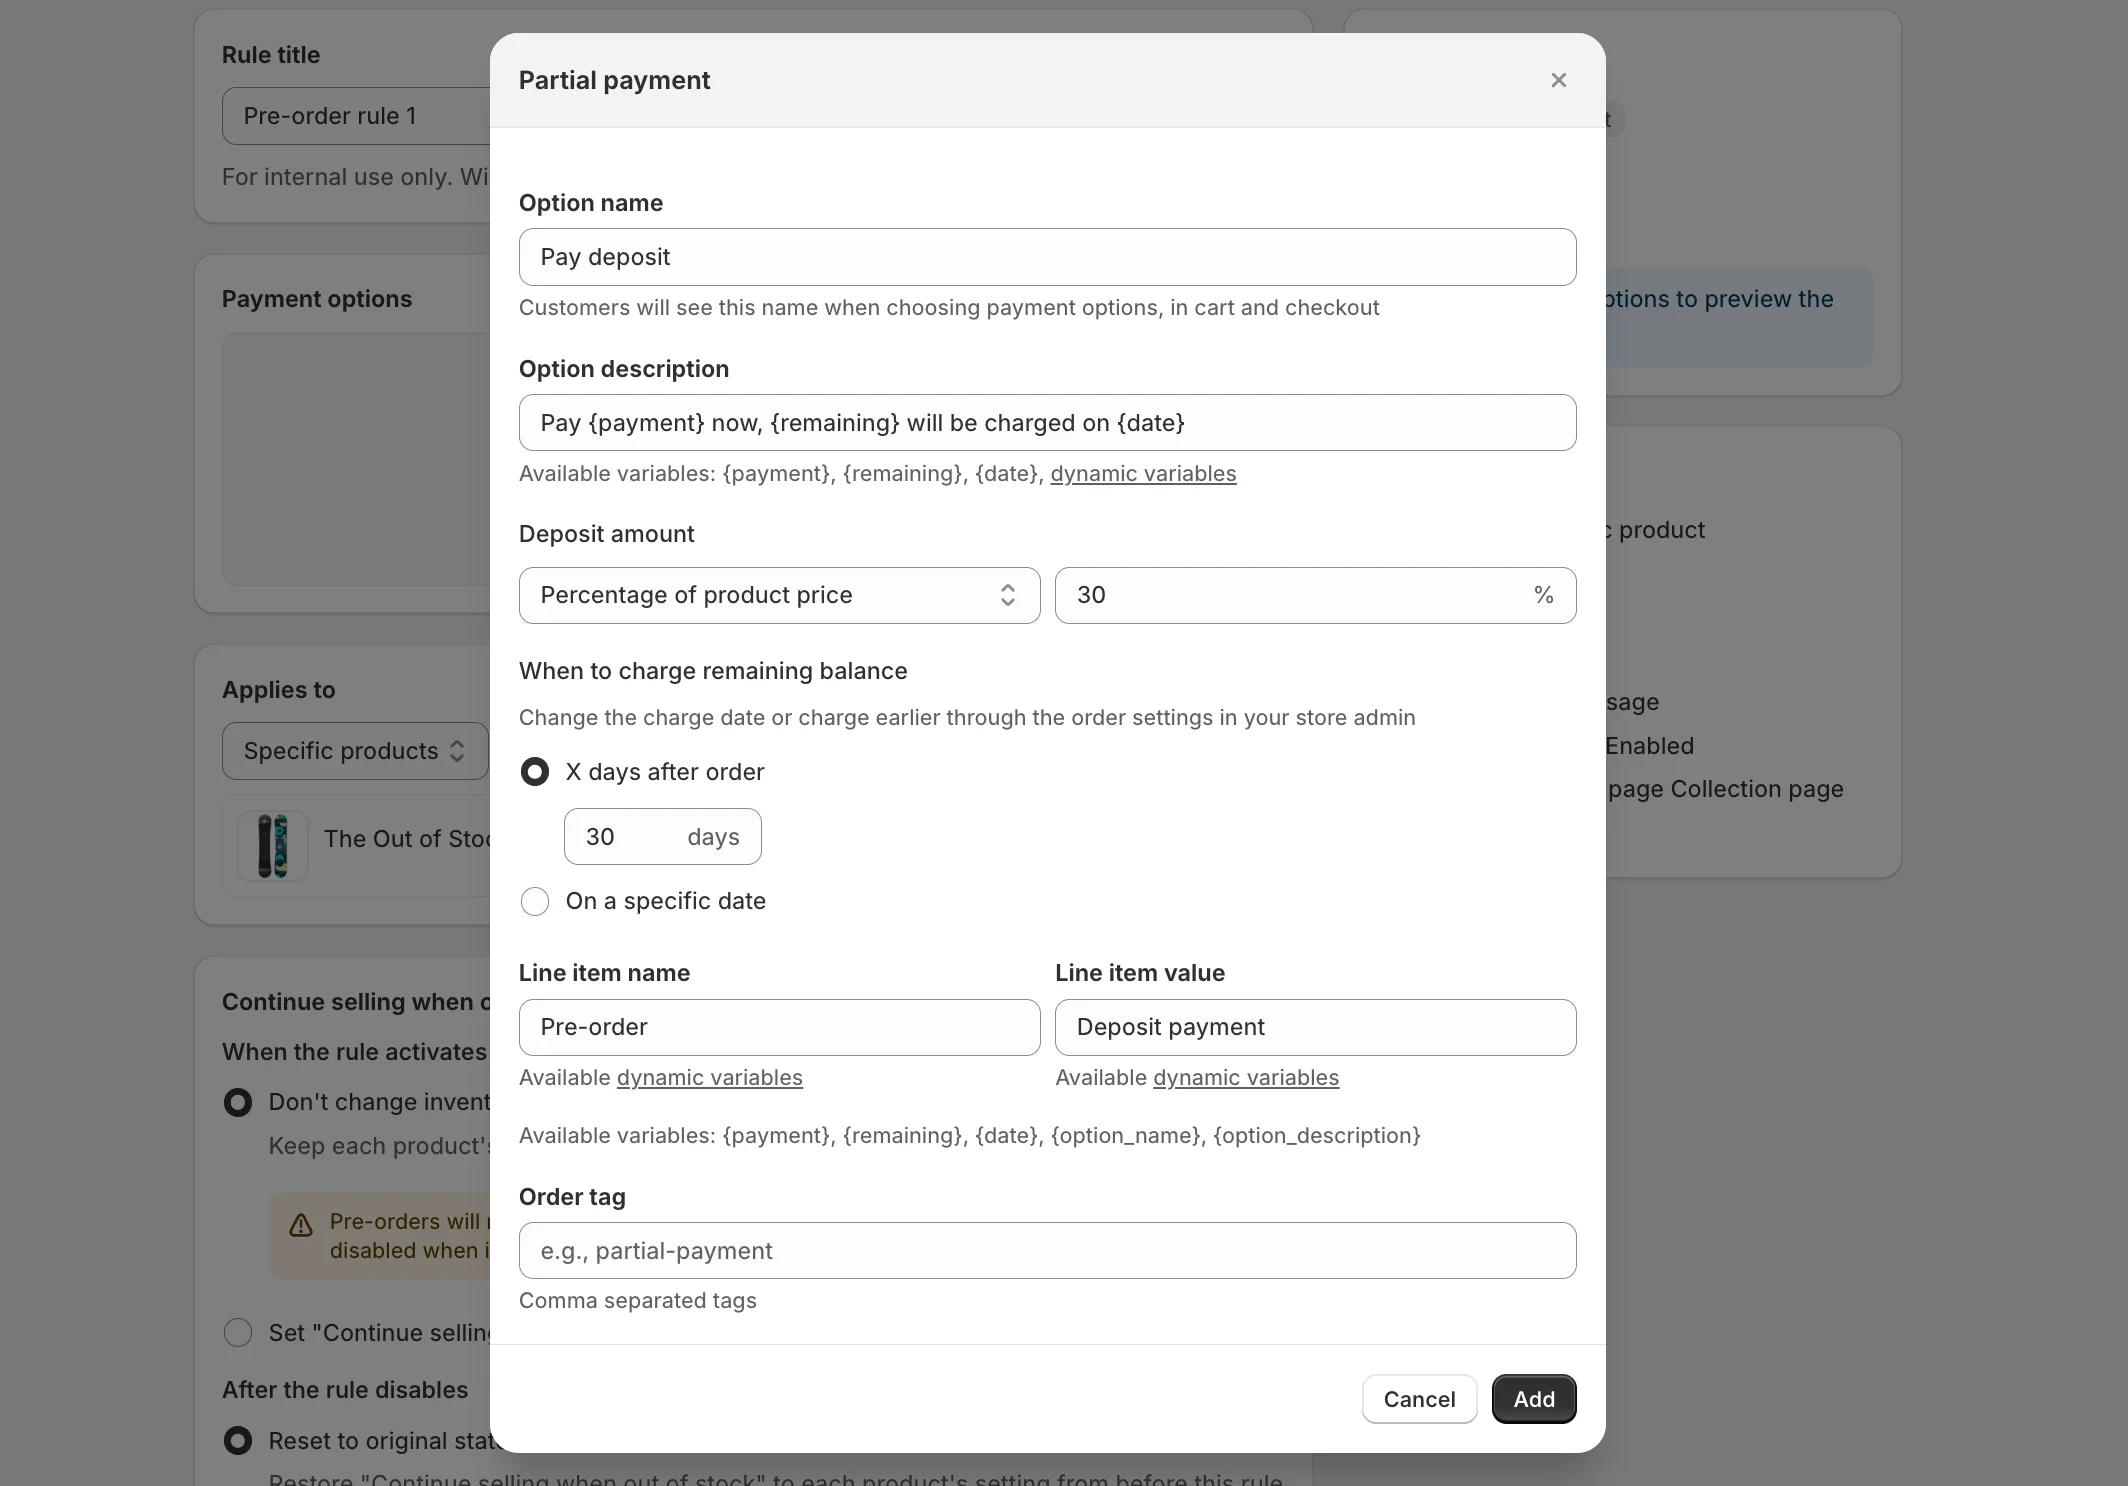
Note: Partial payments use Shopify Selling Plans and require a compatible gateway (Shopify Payments, PayPal Express, Stripe, or Adyen). Full payment works with any gateway.
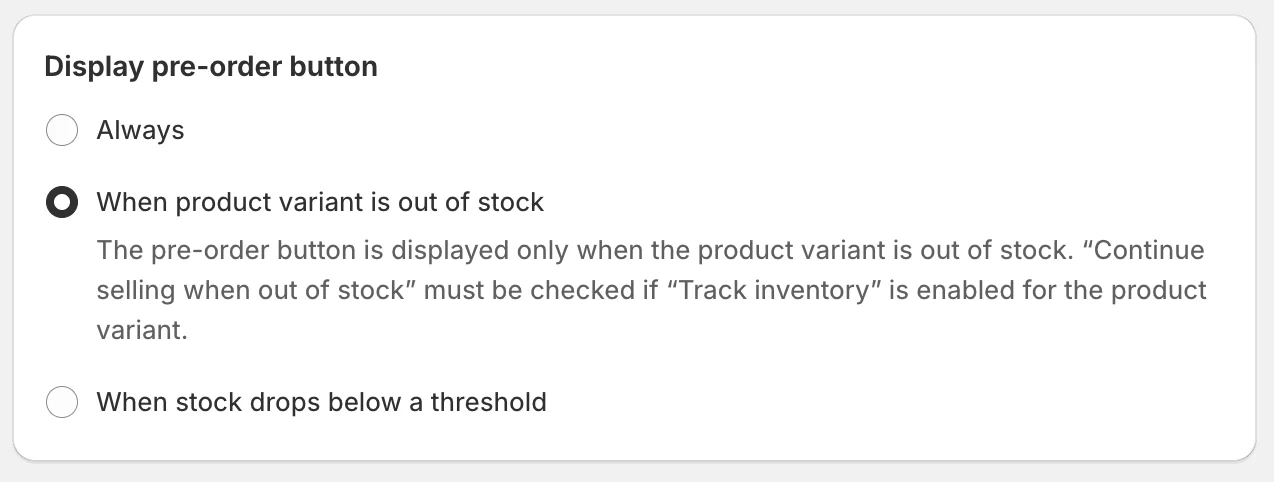
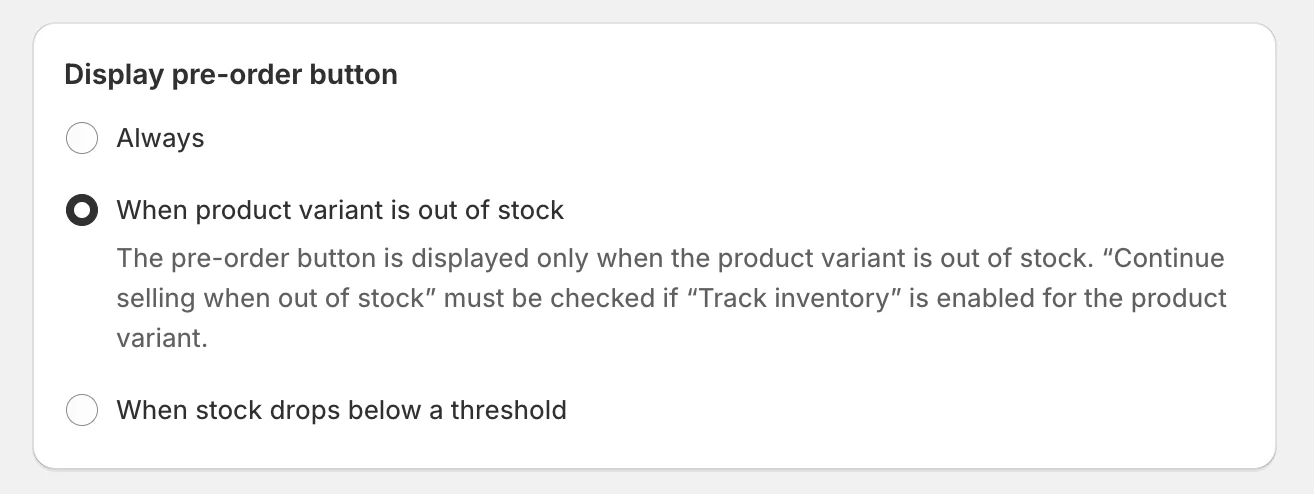
5. Choose Display Mode ("Display Pre-order Button" section)
This determines when the pre-order button appears:
| Mode | When it shows | Best for |
|---|---|---|
| Always | Button shows regardless of stock | Made-to-order items, new launches |
| Out of stock | Only when inventory = 0 | Regular products you restock |
| Below threshold | When stock drops below X units | Capturing demand before sellout |

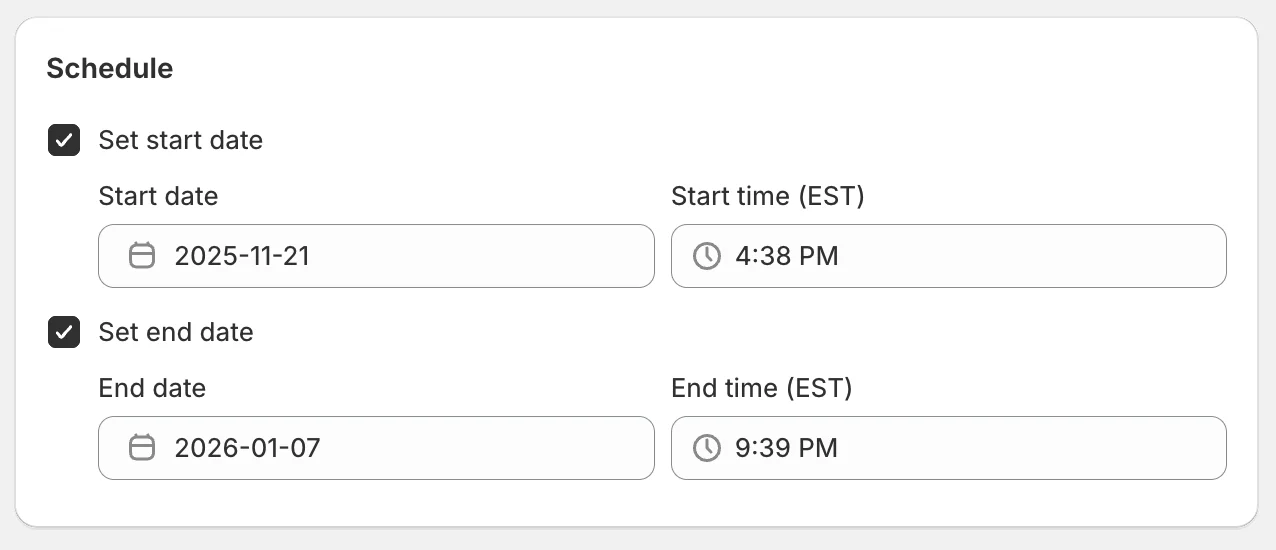
6. Set schedule (optional)
- Set start date: Check this to schedule when the rule activates (future date)
- Set end date: Check this to automatically end the pre-order campaign
- Leave both unchecked for immediate activation with no end date
7. Configure remaining options
- Pre-order Message: Custom text shown to customers (supports rich formatting)
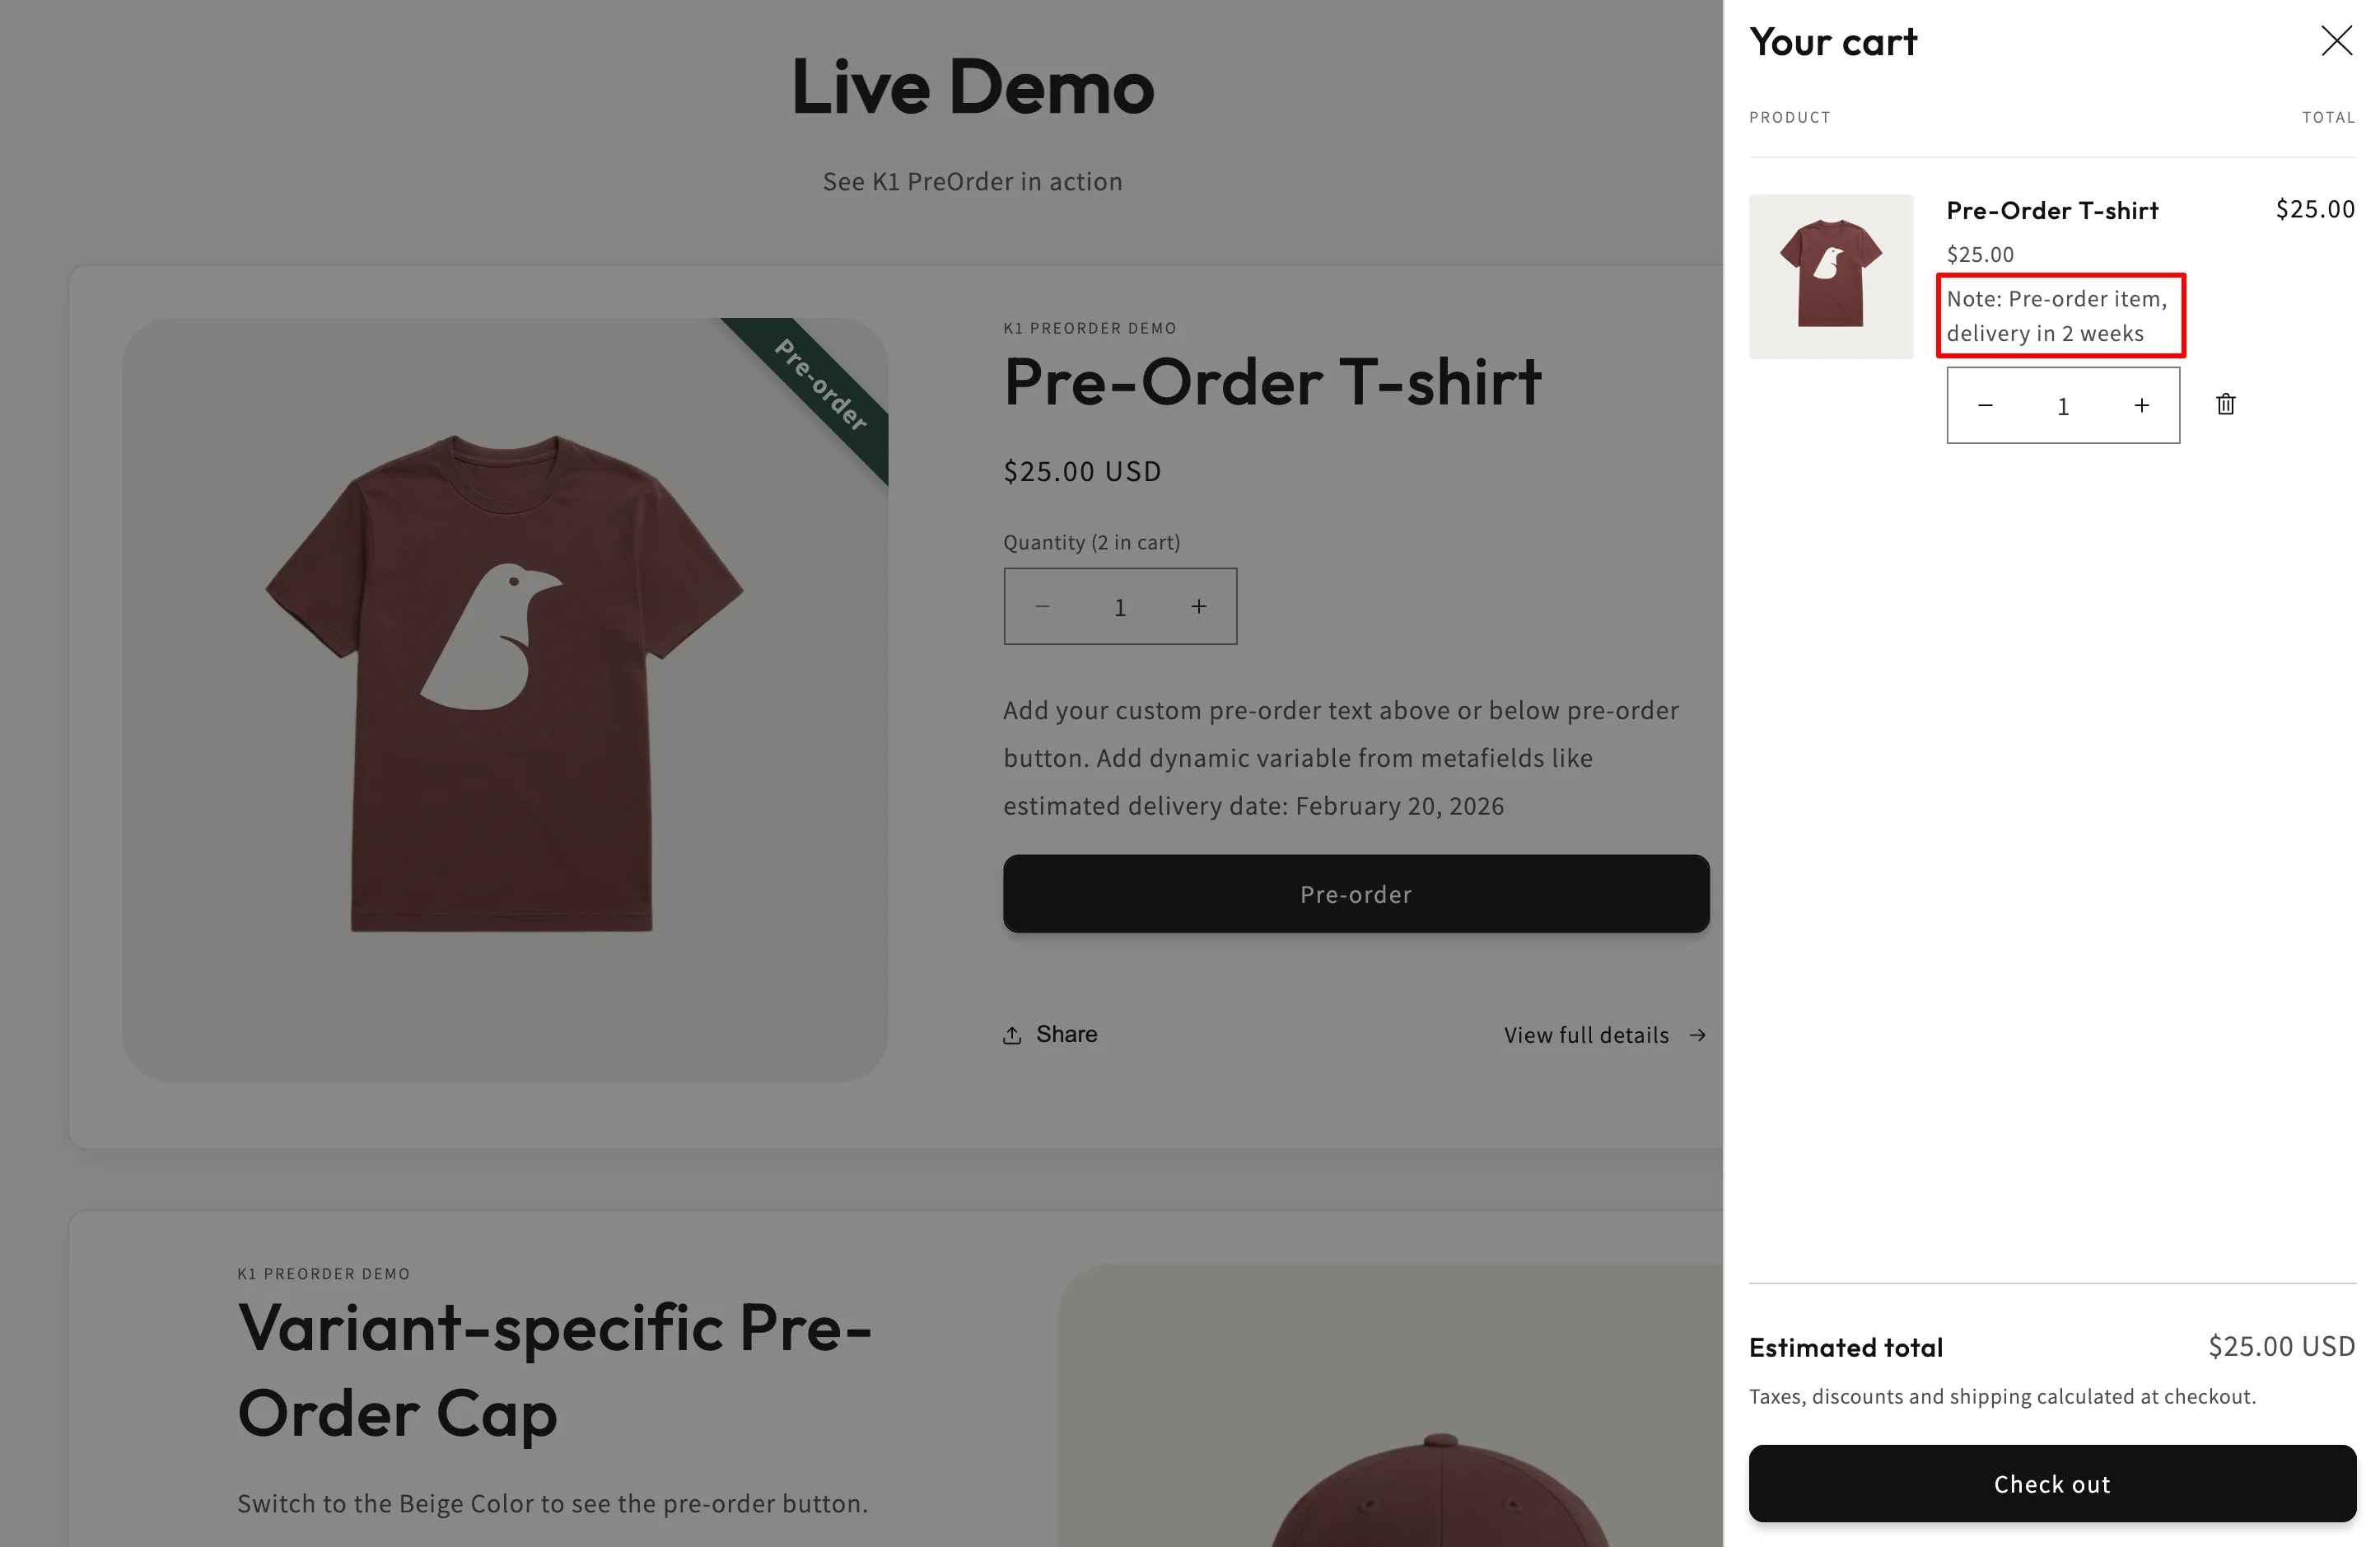
- Inline Item Text: Text displayed on cart line items
- Pre-order Badge: Toggle ON to show badge on product images
- Visibility: Choose where pre-order appears (Product page, Collection page, Home page)
8. Review Summary sidebar
- The right-side summary shows all your selections at a glance
- Verify everything looks correct before saving
9. Save and activate
- Check "Activate the rule after creation" (enabled by default) to make the rule active immediately
- Click Save to create your rule
Step 3: Set Up Out of Stock Triggers
One of the most powerful pre-order features is automatic activation when products go out of stock. This ensures you never show a "Sold Out" button.
Here's how to configure automatic out-of-stock pre-orders in K1 PreOrder:
1. Select the "Out of stock" display mode
When creating or editing a rule, in the "Display Pre-order Button" section:
- Select "Out of stock" from the dropdown
- The pre-order button will automatically appear only when inventory reaches zero
2. Configure CSWOOS Automation
Below the "Applies To" section, you'll find CSWOOS (Continue Selling When Out of Stock) automation options:
| Setting | Option | What it does |
|---|---|---|
| Activation | Set CSWOOS to ON ✅ (recommended) | Automatically enables CSWOOS for all products when rule activates |
| Activation | Don't change settings | Keeps existing settings; shows warning if CSWOOS disabled |
| Deactivation | Reset to original state (default) | Restores each product's original CSWOOS when rule ends |
| Deactivation | Set CSWOOS to OFF | Forces CSWOOS off for all products when rule deactivates |

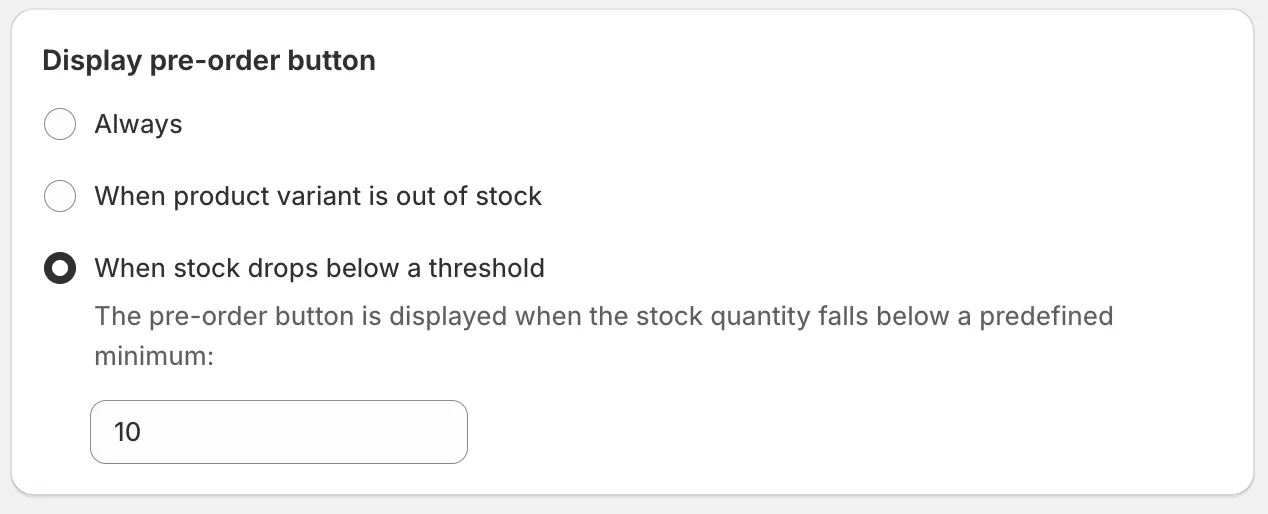
3. Set inventory threshold (optional)
For even earlier pre-order activation, use "Below threshold" mode:
- Enter the stock level that triggers pre-order (e.g., 5 units)
- Pre-order button appears when inventory drops below this number
- Supports negative values for special cases
What happens when products restock:
- The app monitors inventory levels across all active locations in your shop
- When stock returns above the threshold (or above zero for "Out of stock" mode), the regular "Add to Cart" button automatically returns
- CSWOOS settings are restored based on your deactivation option
Best practices:
- Use "Out of stock" mode for products you regularly restock
- Use "Below threshold" mode to capture demand before complete sellout
- Always keep "Set CSWOOS to ON" selected to ensure pre-orders work properly
- The app automatically handles all Shopify inventory settings — no manual changes needed
How "Continue Selling When Out of Stock" Works:
According to Shopify's inventory documentation, the "Continue selling when out of stock" setting allows orders even with zero inventory.
K1 PreOrder intelligently manages this setting:
- When pre-order activates: App enables "Continue selling" for affected products
- When pre-order ends: App restores your original inventory settings
- Prevents overselling: Automatic management ensures no manual errors
Why this matters:
- No manual inventory setting changes
- Products automatically switch between regular and pre-order
- Original settings preserved when pre-order campaign ends
- Works seamlessly with Shopify's inventory tracking
Learn more about handling out of stock products on Shopify →
Step 4: Customize Button & Messages
Clear messaging is essential for pre-orders. Customers need to know exactly what they're buying and when to expect delivery.
Most pre-order apps let you customize two things: how the button looks and what message customers see.
Button Customization
Your pre-order button should stand out while matching your brand:
- Button text — Change "Pre-order" to something more specific like "Reserve Now" or "Pre-Order - Ships March 15"
- Colors — Match your store's branding or make the button stand out
- Badge — Optional label on product images to highlight pre-order items
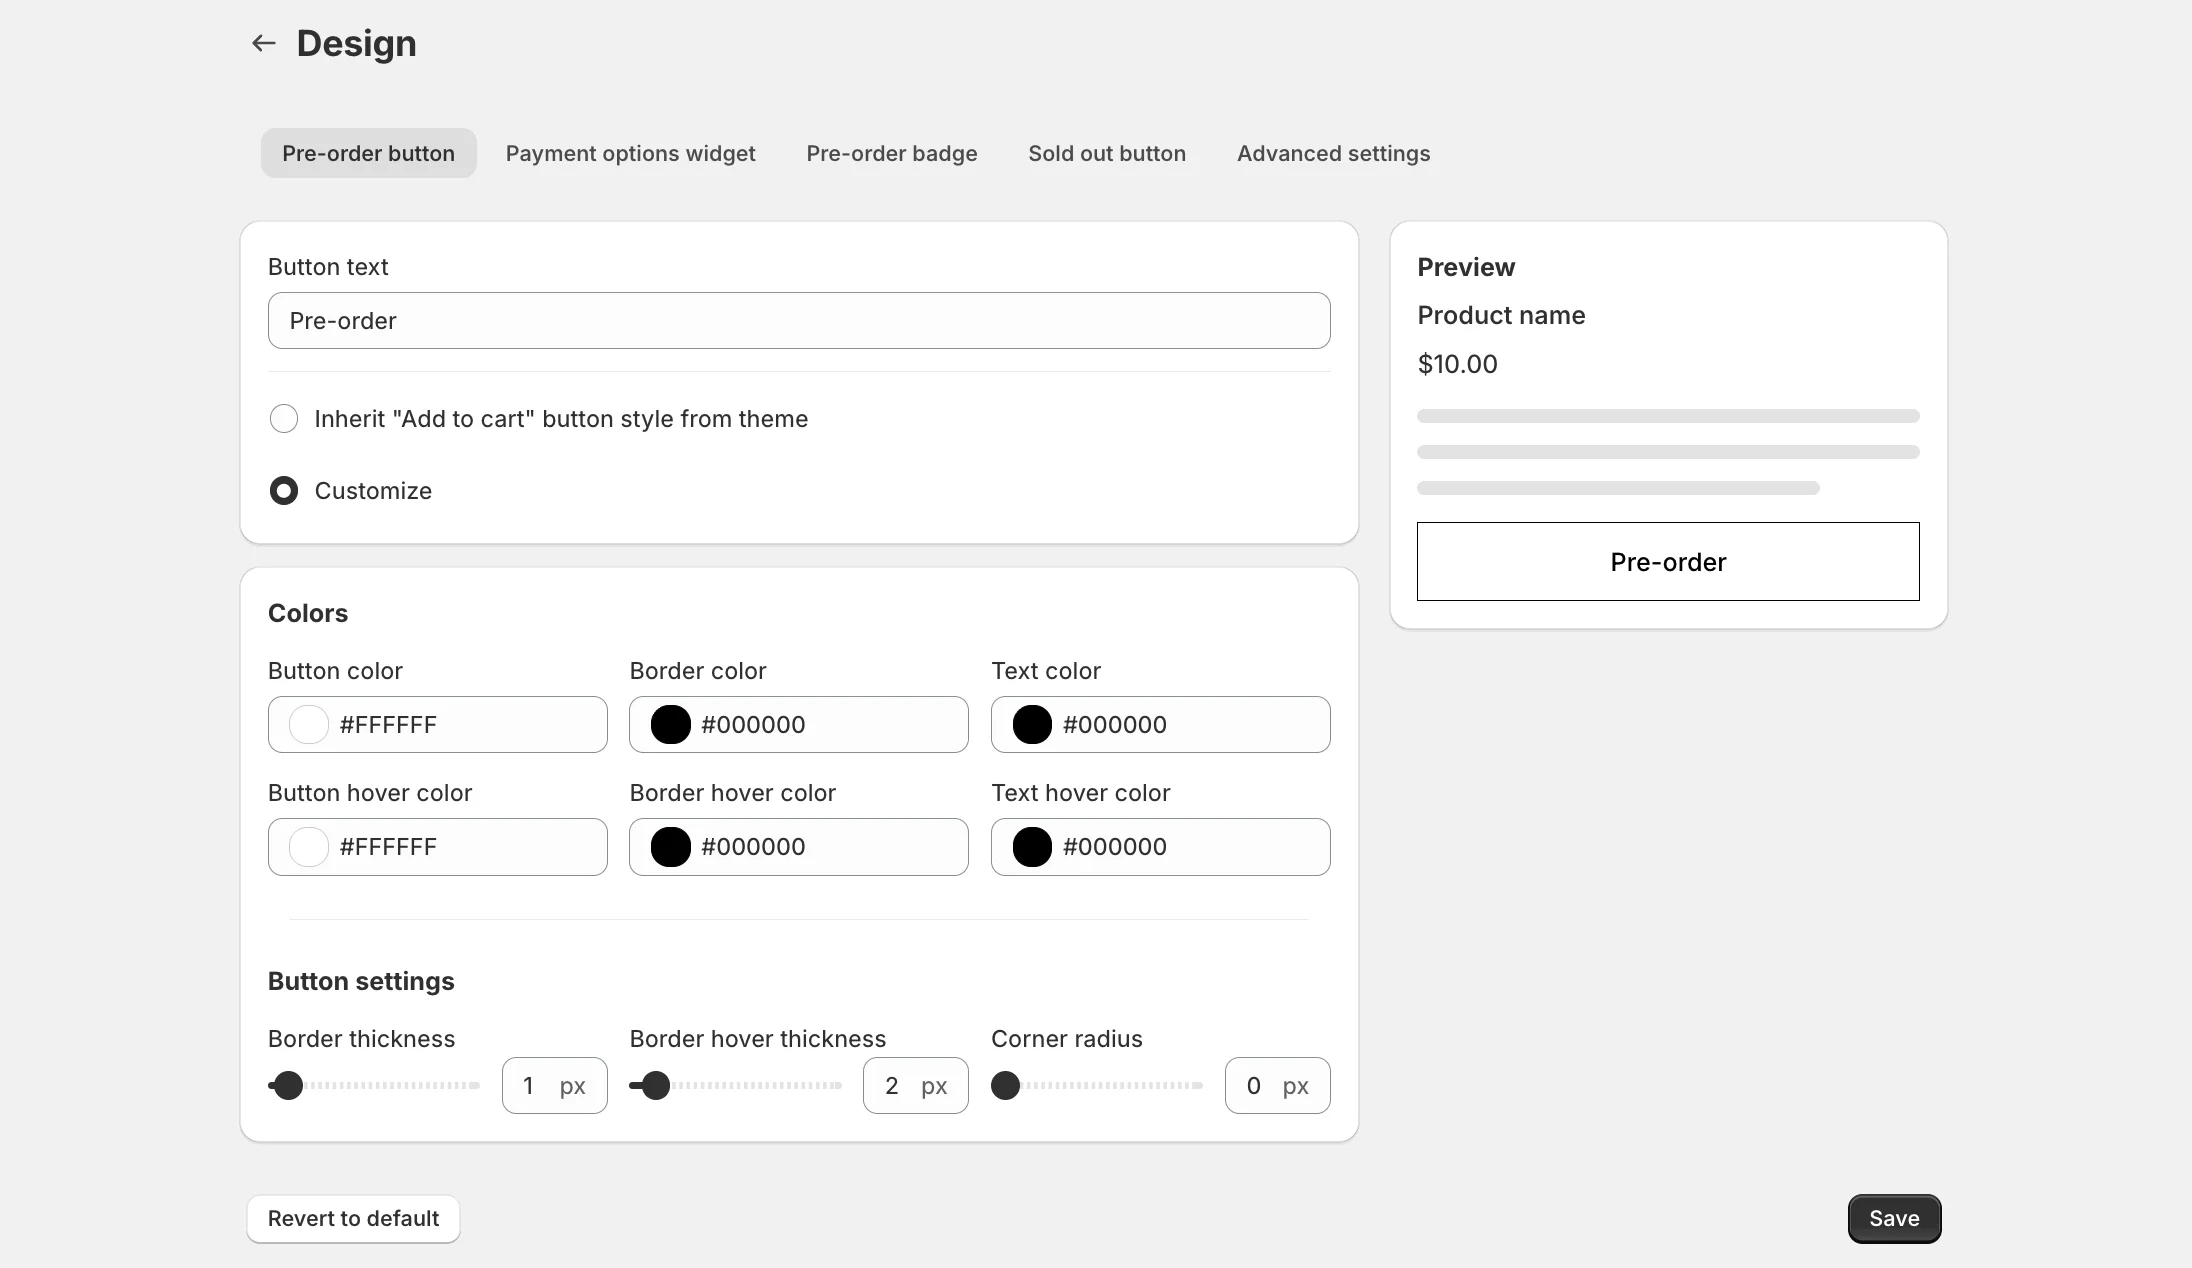
Tip: K1 PreOrder can automatically inherit your theme's "Add to Cart" button style, so your pre-order button looks native to your store without any manual styling.
Message Customization
The pre-order message appears near the button and sets customer expectations. This is the most important customization:
What to include in your message:
- Expected ship date (specific date or range)
- Payment terms (charged now or later)
- Any special conditions
Good message examples:
✅ "Pre-order now! Expected to ship March 15, 2026. You'll be charged today."
✅ "Reserve yours — ships February 2026. Be among the first to receive our new collection!"
✅ "This item is currently in production. Expected delivery: 4-6 weeks."
What to avoid:
❌ "Coming soon" — Too vague, no actionable information
❌ "Currently unavailable" — Sounds like you can't buy it
❌ "Buy Now" — Doesn't indicate it's a pre-order
Cart & Checkout Messages
Customers should see pre-order status throughout their purchase:
- Cart line item — Shows pre-order label next to the product
- Checkout — Reminds customers this is a pre-order
- Order confirmation — Confirms expected ship date
Pro tip: Include the expected ship date in cart messages so customers don't need to go back to the product page for details.
Step 5: Test Your Pre-Order
Testing ensures customers see the correct information and can complete pre-orders without issues.
Testing checklist:
✅ Product page display
- Pre-order button appears correctly
- Message shows estimated ship date
- Badge displays on product images
- Works on mobile devices
✅ Add to cart functionality
- Product adds to cart successfully
- Cart shows pre-order status
- Multiple items work together
- Cart note or tag indicates pre-order
✅ Checkout process
- Pre-order message visible at checkout
- Payment processes correctly
- Order confirmation shows pre-order status
✅ Order management
- Orders tagged appropriately in Shopify admin
- You can filter pre-orders easily
- Customer receives proper confirmation email
- Staff can identify which orders are pre-orders
Testing your K1 PreOrder setup:
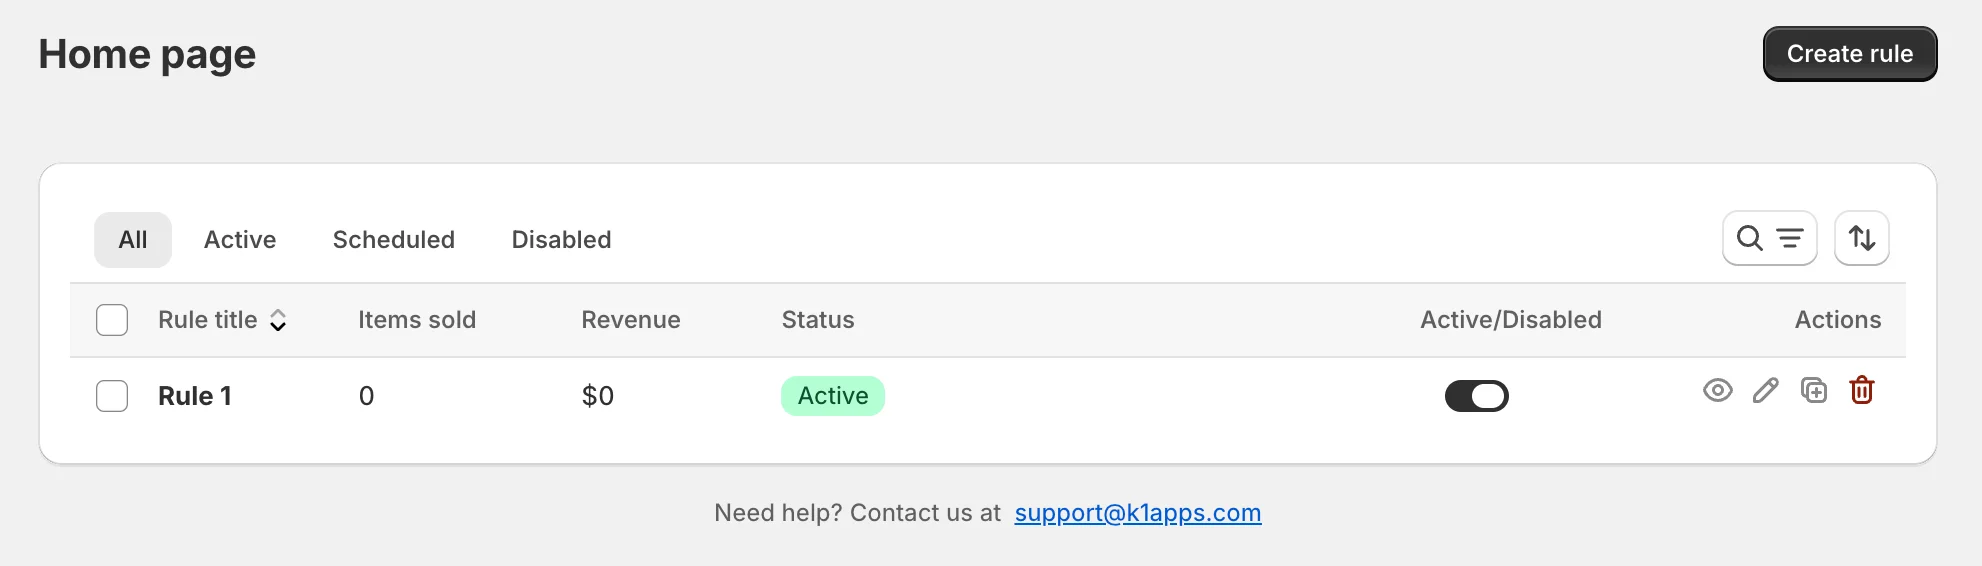
1. Verify rule status in the app
- Go to K1 PreOrder dashboard (Home page)
- Check your rule shows "Active" status in the Status column
- If it shows "Scheduled" or "Disabled", use the toggle switch to activate it
- Look for any conflict warning icons (⚠️) next to the rule name
2. Use the Preview button
- On the Rules List, find the Preview button (eye icon) in the Actions column
- Click it to open your storefront with a pre-order product
- Note: Preview is only available for Active rules with the app embed enabled
3. Place a test pre-order
- Visit a product covered by your rule on your live storefront
- Verify the "Pre-order" button appears instead of "Add to Cart"
- Add the item to cart and check that the pre-order label displays on the line item
- Complete checkout (you can refund yourself afterward)
4. Check order in Shopify admin
- Go to Shopify Admin → Orders
- Find your test order
- Verify the "Pre-order" tag appears on the order
- Use the filter: Orders → Filter → Tag → Contains → "Pre-order"
5. Test different scenarios
- Switch between variants to confirm button changes correctly
- Test on mobile devices for responsive behavior
- If using "Out of stock" mode, adjust inventory to 0 and verify the button appears
Common testing mistakes to avoid:
- Only testing on desktop - Always check mobile responsiveness
- Not testing checkout - Ensure payment processing works
- Forgetting to check admin - Verify order tags and notes appear
- Not testing with other apps - Check compatibility with your other apps
- Skipping variant testing - Test different product variants if applicable
Pre-Order Best Practices
Follow these proven strategies to maximize pre-order success and customer satisfaction:
1. Be Transparent About Timelines
DO:
- Give specific dates when possible ("Ships March 15, 2026")
- Provide date ranges if exact date unknown ("Ships mid-March 2026")
- Update customers if delays occur
- Set realistic expectations
DON'T:
- Use vague terms like "coming soon" or "later"
- Promise dates you can't meet
- Hide pre-order nature of purchase
- Forget to update if timelines change
According to Shopify's pre-order UX guidelines, clear communication about delivery timelines is essential for customer trust.
2. Manage Customer Expectations on Product Pages
Your product page should clearly indicate:
✅ What customers get:
- The product is on pre-order
- When it will ship
- Payment terms (charged now vs. charged later)
- Any limitations or conditions
✅ What's included in messaging:
Example good message:
"Pre-Order Now - Expected Delivery February 2025

This item is currently in production. You'll be charged
when placing your order, and we'll ship as soon as stock
arrives. Expected ship date: February 15, 2025.

Have questions? Contact us at support@example.com"
3. Offer Incentives to Pre-Order Customers
Encourage pre-orders with benefits:
- Early bird pricing - 10-15% discount for pre-orders
- Exclusive bonuses - Extra items, upgraded shipping, special packaging
- Limited quantities - "Only 50 pre-order spots available"
- VIP status - First to receive new products, special community access
Example incentive structure:
Pre-Order Benefits:
✓ Save 15% off regular price
✓ Free express shipping (normally $15)
✓ Exclusive pre-order bonus gift
✓ Be first to receive our new collection
4. Separate Pre-Order and Regular Orders in Fulfilment
Use order tagging:
K1 PreOrder and most pre-order apps automatically tag orders. Use these tags to:
- Filter orders in Shopify admin
- Set up automated fulfilment workflows
- Prevent accidentally shipping pre-orders early
- Track pre-order performance separately
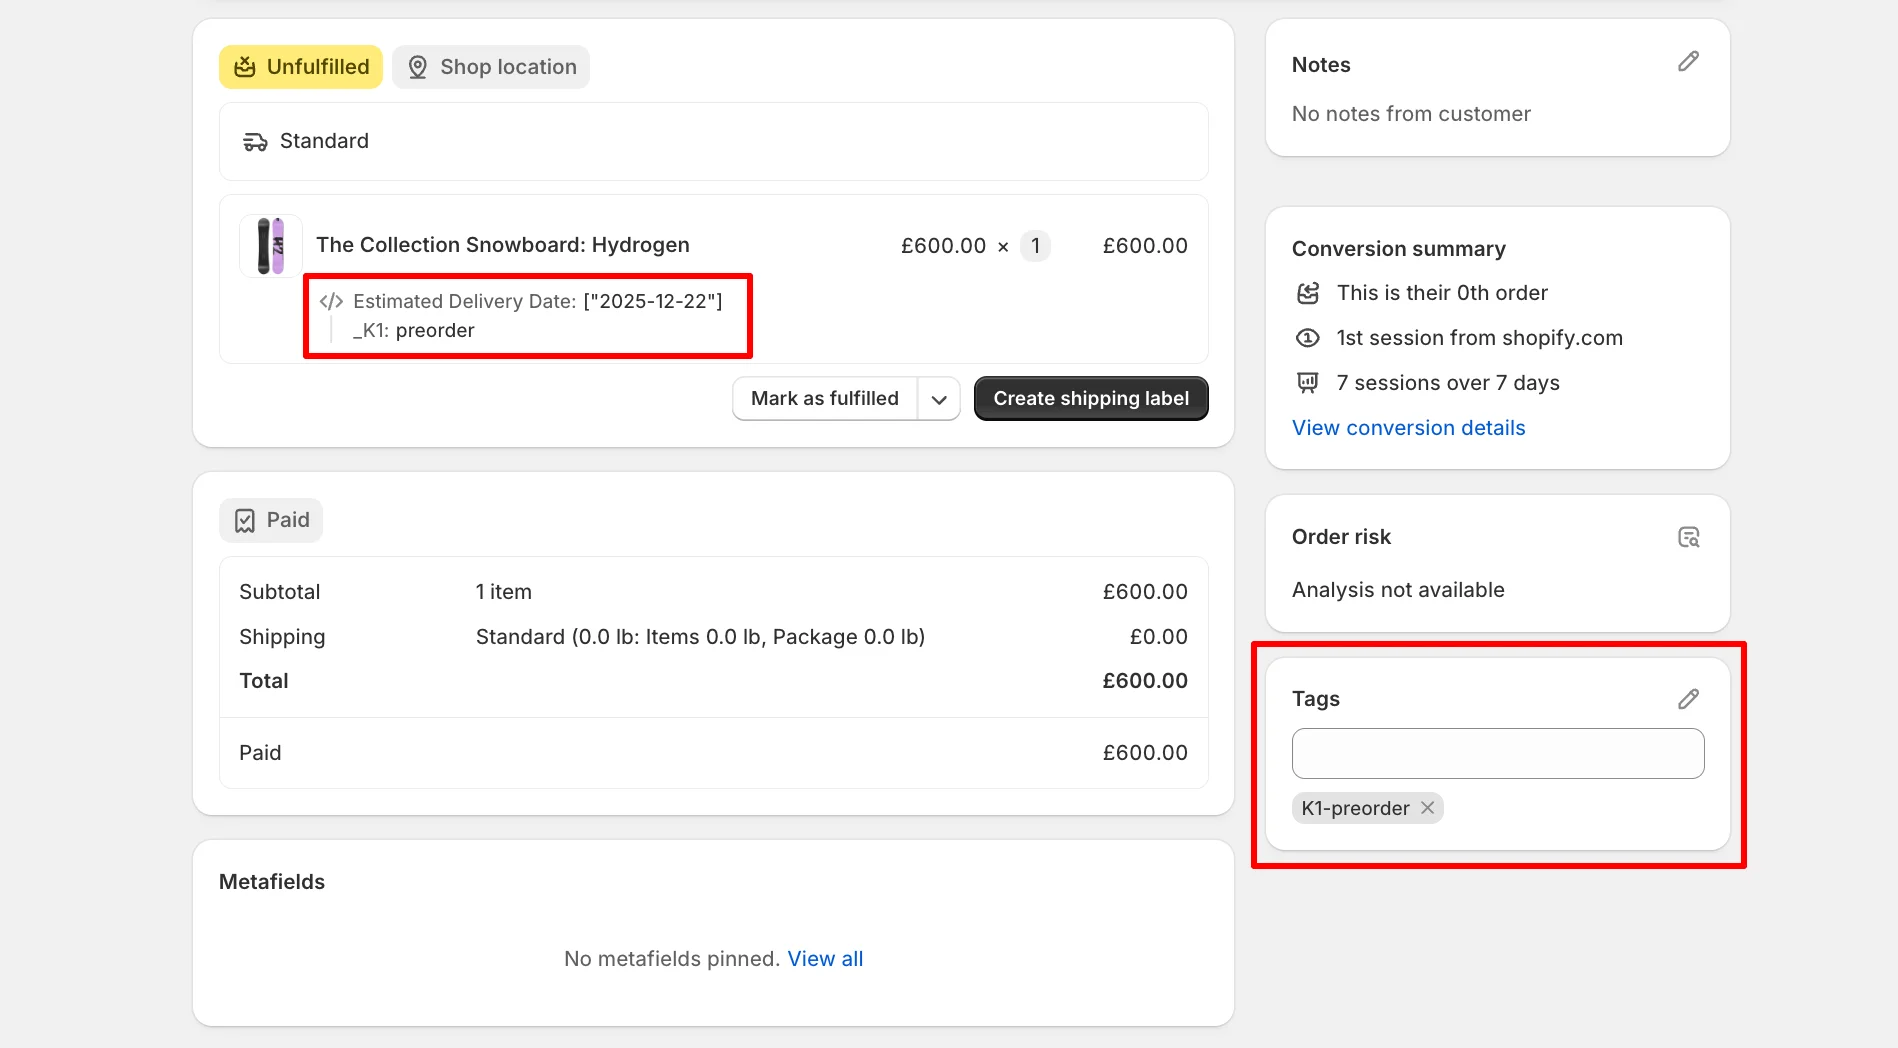
K1 PreOrder Order Tagging:
K1 PreOrder automatically tags orders to help you identify and manage pre-orders:
Default tag: K1-preorder
- Applied at the order level when any line item is a pre-order
- Tag is global (one tag per order, not per line item)
- Applied automatically at checkout — no manual setup required
Where tags appear:
- Shopify Admin → Orders — visible in order list and detail view
- Order exports — included in CSV exports for reporting
- Shopify Flow — can trigger automations based on tag
Filtering pre-orders in Shopify admin:
Orders → Filter → Tag → Contains → "Pre-order"Save this as a custom filter for quick access.
Using tags with fulfillment services:
- Tags sync to fulfillment apps (ShipStation, etc.)
- Create fulfillment rules based on "Pre-order" tag
- Set orders with pre-order tag to "hold" until inventory arrives
- Use Shopify Flow to automate notifications or workflows
Note: Order tags use the customer's language at checkout time and don't change retroactively if language preferences change later.
5. Keep Customers Updated
Communication builds trust and reduces support tickets:
Recommended update schedule:
- Order confirmation - Immediate
- Production updates - Monthly or at milestones
- Shipping notification - When order ships
- Delay notifications - If delays occur
Email template example:
Subject: Update on Your Pre-Order #12345
Hi [Customer Name],
Great news! Your pre-order for [Product Name] is currently
in production and on track for our February 15th ship date.
We're excited to get this to you and will send another
update once it ships with tracking information.
Thanks for your patience and for being an early supporter!
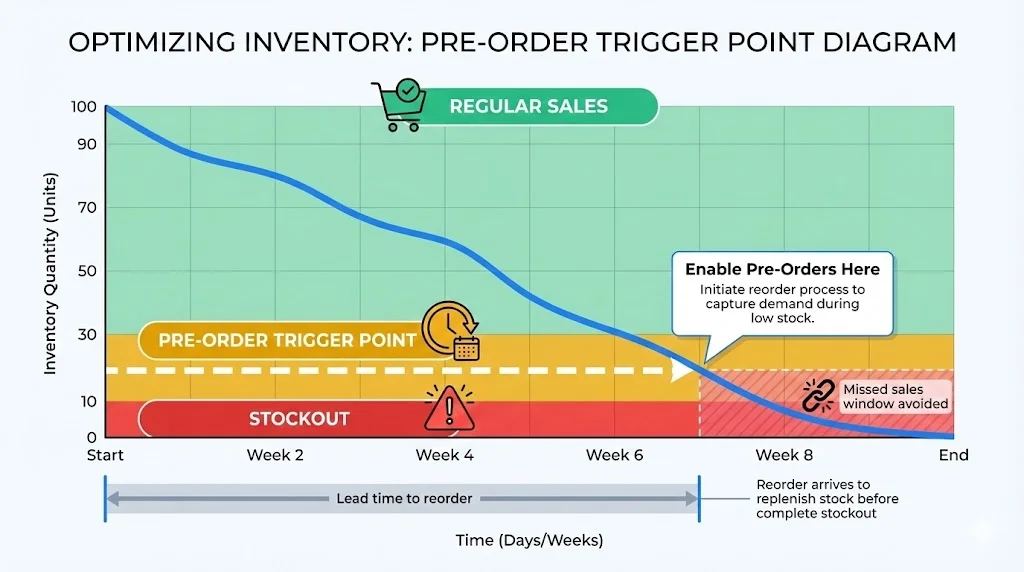
[Your Store Name]6. Set Inventory Thresholds Strategically
Rather than waiting until you're completely sold out, enable pre-orders when inventory is low:
Example threshold strategy:
- Regular product with typical stock: 10 units
- Seasonal/trending item: 20 units
- Slow-moving product: 5 units
This approach:
- Captures demand before stockout
- Gives you lead time to reorder
- Reduces "missed sale" window
- Improves inventory planning
7. Handle Cancellations Gracefully
Despite best efforts, some customers will want to cancel. Make it easy:
Cancellation policy best practices:
✅ DO:
- Allow cancellations before shipping
- Process refunds promptly
- Make cancellation process clear and simple
- Include cancellation policy on product page
❌ DON'T:
- Make customers jump through hoops
- Delay refunds unnecessarily
- Hide cancellation policy
- Penalize customers for canceling
Sample pre-order cancellation policy:
Pre-Order Cancellation Policy

You may cancel your pre-order at any time before
shipping for a full refund. Once your order ships,
our standard return policy applies.

To cancel, email support@example.com with your
order number. Refunds typically process within
5-7 business days.
Common Problems & Solutions
Problem 1: "Sold Out" Button Still Showing
Symptoms:
- Pre-order rule is active but "Sold Out" appears
- Button doesn't change on product page
Solutions:
- Check theme compatibility
- Verify "Continue selling" setting
- Clear theme cache
- Check variant selection
K1 PreOrder-specific troubleshooting:
1. Verify rule is active
- Open K1 PreOrder app → Home page
- Check the Status column shows "Active" (not "Disabled" or "Scheduled")
- Use the toggle switch to activate if needed
2. Check for conflicts
- Look for the warning icon (⚠️) next to the rule name
- Conflicts occur when multiple rules target the same product
- Click the warning to see affected products
- Resolution: Disable conflicting rules or adjust product selection
3. Verify app embed is enabled
- A yellow warning banner appears on the Home page if the app embed is disabled
- Click "Enable the app" to open the theme customizer
- Save in the theme editor to activate
4. Check theme compatibility
- K1 PreOrder supports most Shopify themes including Dawn, Sense, Refresh, Motion, and others
- If using a custom theme, a notification banner may appear
- Contact support via the in-app chat for custom theme integration assistance
Contact support: Use the chat widget in the bottom-right corner of the K1 PreOrder app.
Problem 2: Pre-Order Not Working for Specific Products
Common causes:
- Product type restrictions
- Collection rules conflict
- Inventory tracking disabled
Solution steps:
Step 1: Verify product has inventory tracking enabled
  → Product → Inventory → Track quantity enabled

Step 2: Check product is in correct collection
  → Product → Organization → Collections

Step 3: Review conflicting rules
  → Check if multiple pre-order rules apply

Step 4: Test with fresh variant
  → Create new variant and test if it works
Problem 3: Cart Shows Wrong Information
Issue: Cart doesn't display pre-order message or shows incorrect information
Causes & Solutions:
A. Theme cart template not updated
- Many themes have custom cart templates
- Solution: App needs to modify cart.liquid or cart section
- Contact app developer for cart integration help
B. Ajax cart interference
- Themes using Ajax/drawer cart need special integration
- Solution: Enable "Ajax cart support" in app settings
C. Multiple currencies or languages
- Message might not show for all currencies/languages
- Solution: Configure messages for each language/currency
K1 PreOrder Cart Integration:
Inline cart labels:
- K1 PreOrder displays pre-order status as an inline label on cart line items
- Labels appear in: cart page, checkout review, and order status pages
- Configure the label text in each rule's "Inline Item Text" field
- Use
\{pre-order_message\}variable to include the full pre-order message
Multi-language support:
- Cart labels are automatically translated based on customer's language
- Configure translations in Settings → Multilingual Translation
- If no translation exists, defaults to your primary language text
Common cart issues and fixes:
| Issue | Solution |
|---|---|
| Label not showing | Verify "Inline Item Text" is set in rule settings |
| Wrong language | Check translations in Settings → Multilingual Translation |
| Mixed cart display | Only pre-order line items show the label (by design) |
| Ajax/drawer cart issues | Contact support for custom theme integration |
Theme compatibility:
K1 PreOrder works with standard Shopify cart templates. If your theme uses a heavily customized Ajax or drawer cart, contact support via the in-app chat for assistance with custom integration.
Problem 4: Orders Not Tagged Properly
Issue: Pre-orders appear in Shopify admin without tags or proper identification
Why tagging matters:
- Filter pre-orders for fulfillment
- Track pre-order revenue separately
- Prevent early shipment
- Generate pre-order reports
Solutions:
- Verify tag settings in app
- Check order timing
- Manual tagging backup
How to filter pre-orders in Shopify admin:
Orders → Filter → Tag → Contains → "preorder"

Or create saved filter:
"Pre-Order Orders" → Save filter
Problem 5: Payment Issues with Pre-Orders
Payment compatibility depends on how the pre-order app is built technically. There are two approaches:
Approach 1: Button Replacement (Universal Compatibility)
Some apps simply replace the "Add to Cart" button with a "Pre-Order" button and charge the full amount at checkout using Shopify's standard checkout flow.
Payment compatibility: Works with ANY payment gateway
- Shopify Payments, PayPal, Stripe, Klarna, Afterpay
- Local payment methods (iDEAL, Bancontact, etc.)
- Cash on delivery, bank transfers
- Buy Now Pay Later services
- Accelerated checkouts (Shop Pay, Apple Pay, Google Pay)
Why it works everywhere: The pre-order is processed as a regular order. Shopify handles payment normally — the app only changes the button text and adds messaging/tagging.
K1 PreOrder uses this approach for full payment pre-orders, making it compatible with any Shopify store regardless of payment setup. With V2, K1 PreOrder also supports Selling Plans for partial payment pre-orders with deposits.
Approach 2: Selling Plans / Deferred Purchase Options (Limited Compatibility)
Some apps use Shopify's Selling Plans API to create native pre-orders. This is required for partial payments (deposits) where customers pay a percentage now and the balance later.
Payment compatibility: Limited to specific gateways
| ✅ Supported for Selling Plans | ❌ Not Supported |
|---|---|
| Shopify Payments | Most local payment methods |
| PayPal Express | Cash on delivery |
| Stripe (eligible merchants) | Bank transfers |
| Adyen on Shopify | Buy Now Pay Later services |
Why restrictions exist: Selling Plans require payment method vaulting (saving the card) to charge the remaining balance later. Only certain gateways support this Shopify feature.
Which approach does your app use?
Full payment pre-orders (100% charged at checkout):
- If app uses button replacement → works with any gateway
- If app uses Selling Plans → gateway restrictions apply
Partial payment pre-orders (deposit + balance later):
- Always requires Selling Plans → gateway restrictions always apply
K1 PreOrder uses button replacement for full payment (any gateway). It also supports Selling Plans for partial payments/deposits (requires Shopify Payments, PayPal Express, Stripe, or Adyen).
Tip: If you're unsure which approach your pre-order app uses, check if it works with local payment methods or BNPL services. If yes, it's likely using button replacement.
FAQ
Q: Can I use pre-orders on Shopify without an app?
A: Yes, but it's limited. You can:
- Manual method: Edit theme code to show "Pre-Order" instead of "Add to Cart"
- Use product variants: Create "Pre-Order" variant manually
- Product descriptions: Simply add pre-order notice in description
However, these manual methods lack:
- Automatic out-of-stock detection
- Scheduled campaigns
- Order tagging
- Inventory management
- Button automation
Verdict: Apps are recommended for reliable, full-featured pre-orders. Manual methods work for simple, one-time campaigns but require constant maintenance.
Learn more: Shopify Pre-Order Without App →
Q: What's the difference between pre-order and backorder?
| Aspect | Pre-Order | Backorder |
|---|---|---|
| Product status | Not yet released/available | Was available, now temporarily out of stock |
| Timeline | Planned launch or production schedule | Expected to restock soon |
| Typical use | New products | Existing products |
| Primary purpose | Marketing opportunity | Inventory management solution |
Practical difference:
Pre-Order example:
"New iPhone 17 - Pre-Order Now for February Launch!"

Backorder example:
"Currently out of stock - Expected back in stock March 1st"
Both use same Shopify functionality (selling plans) but different customer messaging.
Learn more: Shopify Backorder Guide →
Q: Can I offer pre-orders only when products go out of stock?
A: Yes! This is one of the most popular pre-order use cases.
Setup:
Setting up out-of-stock pre-orders in K1 PreOrder:
Step 1: Create a new rule or edit an existing one
Step 2: In "Display Pre-order Button" section, select "Out of stock"
- The pre-order button will only appear when inventory reaches zero
Step 3: Configure CSWOOS automation
- Select "Set 'Continue selling when out of stock' to ON" (recommended)
- This ensures customers can add items to cart even at zero inventory
Automatic behavior:
- When inventory = 0: Pre-order button automatically appears
- When inventory > 0: Regular "Add to Cart" button returns automatically
- No manual intervention needed — the app monitors inventory across all active locations
Deactivation options:
- "Reset to original state" — restores each product's original CSWOOS setting when restocked
- "Set CSWOOS to OFF" — forces CSWOOS off when pre-order ends
Pro tip: Use "Below threshold" mode (e.g., trigger at 5 units) to capture demand before complete sellout.
Benefits of this approach:
- Never show "Sold Out"
- Capture demand during stockouts
- Automatic - no manual work
- Products return to normal when restocked
Learn more: Complete guide to Shopify out of stock solutions →
Q: Do pre-orders work with Shopify POS?
A: No, pre-orders are not supported in Shopify POS. According to Shopify's pre-order limitations:
"Pre-orders and TBYB can't be used through Shopify POS."
Workaround:
- Take pre-orders online only
- Create manual order in admin for in-store pre-orders
- Use tablet/computer for online store checkout in retail location
Q: Can customers pay later for pre-orders?
A: Yes, but requires specific setup:
Option 1: Split payment with selling plans
- 20% deposit at checkout
- 80% charged on specific date
- Requires app supporting Shopify Selling Plans
- Customer payment method saved securely
Option 2: Full payment options
- Charge full amount at checkout (most common)
- No payment until shipping (requires TBYB setup)
Example split payment configuration:
Deposit at checkout: 25%
Remaining balance due: February 15, 2026
Customer pays: $25 now, $75 on Feb 15
K1 PreOrder supports both full payment and split payments (deposits) natively. Configure payment options directly in your pre-order rule — no advanced setup required.
Q: What happens if I need to delay my pre-order fulfilment?
Best practices for handling delays:
- Communicate immediately
- Offer options
- Update product page
Sample delay notification:
Subject: Important Update About Your Pre-Order

Hi [Customer Name],

We need to update you about your pre-order (#12345).
Due to [brief reason], we're experiencing a 2-week
delay. Your new expected ship date is March 1, 2026.

We sincerely apologize for this delay. As a thank you
for your patience, we're including [bonus/discount]
with your order.

If you'd prefer to cancel for a full refund, just reply
to this email.

Thank you for your understanding and support!
Legal considerations:
According to FTC Mail Order Rule, if you can't ship by stated date:
- Notify customer of delay
- Offer option to cancel for refund
- Get customer consent for new date
Q: Are there any products I can't pre-order on Shopify?
| ❌ Cannot Use | ⚠️ May Have Issues | ✅ Work Perfectly |
|---|---|---|
| Gift cards (Shopify restriction) | Products with many variants (100+) | Physical products |
| Digital downloads requiring immediate access | Items requiring age verification | Apparel and accessories |
| Products sold through Shopify POS | Products with subscription attached | Made-to-order items |
| B2B orders (currently not supported) | Furniture and home goods | |
| Electronics, books, cosmetics |
Reference: Shopify pre-order limitations documentation
Q: Can I use pre-orders with other Shopify apps?
| App Type | Compatibility | Notes |
|---|---|---|
| Product customization | ✅ Compatible | Personalization and custom fields work normally |
| Review apps | ✅ Compatible | Reviews display on pre-order products |
| Discount apps | ✅ Compatible | Most discount codes work with pre-orders |
| Email marketing | ✅ Compatible | Klaviyo, Omnisend work; can segment customers |
| Inventory management | ⚠️ Test required | May conflict with pre-order inventory settings |
| Quantity break apps | ⚠️ Test required | Some quantity discount apps may conflict |
| Bundle/upsell apps | ⚠️ Test required | May need special configuration |
Best practice: Test all app combinations before going live with pre-orders.
Q: How do I handle refunds for pre-orders?
Refund policy considerations:
Before shipping:
- Most merchants allow full refunds
- Easy to process (nothing shipped yet)
- Customer just cancels pre-order
After shipping:
- Follow standard return policy
- Treat like normal product return
- Return shipping costs vary by policy
Sample pre-order refund policy:
Pre-Order Refund Policy

Full refund available until order ships:
• No questions asked cancellation
• Full refund within 5-7 business days
• Email support@example.com to cancel

After shipping:
• Standard 30-day return policy applies
• Customer pays return shipping
• Product must be unused/undamaged
Processing refunds in Shopify:
- Go to order in admin
- Click "Refund"
- Select refund amount
- Add reason note
- Send refund
Q: Do I need special payment processing for pre-orders?
Payment processor requirements:
Most pre-orders work with standard Shopify Payments. However, some considerations:
Standard pre-orders (full payment at checkout):
- Works with all payment processors
- No special setup needed
- Customer charged immediately
Split payment pre-orders (deposit + balance):
- Requires payment method vaulting
- Supported processors:
- Shopify Payments
- PayPal Express
- Stripe (eligible merchants)
- Adyen on Shopify
Not supported for split payments:
- Local payment methods
- Cash on delivery
- Bank transfers
- Manual payment methods
Important: Check with your payment processor before offering split payment pre-orders.
Q: Can international customers pre-order?
A: Yes! Pre-orders work for international customers with considerations:
Shipping:
- International shipping times often longer
- Be clear about international delivery estimates
- Consider separate messaging for international customers
Example messaging:
Domestic (US): Ships February 15, 2026
International: Ships February 15, 2026 (allow 2-3
weeks for delivery)
Currency:
- Shopify handles multi-currency automatically
- Pre-order apps work with all currencies
- Show prices in customer's local currency
Customs/Duties:
- Make clear who pays customs (DDP vs DDU)
- Add notice about potential duties
- Consider including in pre-order description
Best practice: Set up separate pre-order campaigns for domestic vs. international if lead times differ significantly.
Conclusion
Setting up pre-orders on Shopify is one of the smartest moves you can make to:
- Never lose sales to stockouts
- Validate product demand before production
- Improve cash flow with advance payments
- Create excitement for product launches
- Manage inventory more effectively
Quick setup recommendations:
- For most merchants: Use a pre-order app like K1 PreOrder (try it free)
- For simple one-time campaigns: Manual theme modification may work
- For enterprise/custom needs: Consider Shopify Functions development
The key to successful pre-orders is clear communication with customers about:
- ✅ When products will ship
- ✅ Payment terms
- ✅ What pre-order means
- ✅ How to get support
Start with one product as a test, refine your process, then expand to more products as you gain confidence.
Next steps:
- Choose your implementation method
- Set up your first pre-order
- Test thoroughly before launching
- Monitor customer feedback
- Optimize based on results
Official Shopify Documentation: